Category Archives: Photography

STOP COOKING AND SMELL THE FLOWERS

Spring has finally come. Or is it summer already? The last big snow storm on the Sangre de Cristos melted a few days ago, and now there is only a tiny sliver of white on the highest peak. Today, the temperature is in the 80s, and tomorrow it is supposed to be over 90.

The western bluebirds and Say’s phoebes have built their nests while the purple house finches are looking for their space. Piñon jays have appeared in great flocks, the first time that has happened in years, perhaps because of the years-long drought and the early spring rains we have had. The spotted towhees are back with their distinctive cheerful sound, and the ravens are brooding in a huge nest built of sticks (too big to be called twigs) in a juniper on the bank of the arroyo. Black-chinned hummingbirds have arrived at the feeders, but it is too early for the more aggressive broad-tails.  It has been a joy to watch the migrants traveling through our yard on their trip up north. Lizards are sunning themselves on the patio wall.

Apricots and peaches put on an early show and then promptly froze, so again there won’t be fruit from the trees in our yard. Lilacs and daffodils have finished their performance, and now the irises and columbines are at their peak with the peonies bowing down as their huge flowers overwhelm the slender stems. The native plants have also begun to color the landscape: evening primroses (both yellow and white varieties), yuccas and their accompanying hawk moths, paintbrush, buckwheat, and Artemisia. The color should start to come in waves now until the winter frost with chollas, fern bushes, desert willows, sacred daturas, desert four-o’clocks, sunflowers, cow pen daisies, and asters joining in at just the appropriate time.

With all of this gong on, it has become harder to cook and to make images in the kitchen, so I decided to take a break and wander around my wife’s beautiful garden. I hope you will forgive this lapse, and I also hope that you enjoy this little break from cooking.

Enjoy your summer ahead.

3 Comments

Filed under Photography

OAK-SMOKED SHRIMP WITH TRUMPET MUSHROOM RISOTTO

Our local farmers market stays open all year, but only now have the growers occupied their open-air stalls. There is still wind and cold weather, so about the only things available are greens and a few root vegetables. One exception to that is the beautiful trumpet mushrooms available from the  “mushroom man”. If you are like me, you wind up buying way more from the vendors than you can possibly use. I try to plan daily menus in my mind as I walk down the aisles. Invariably, my eyes and appetite fail me so that when the end of the week and a new farmers market arrives, there are things still in the vegetable crisper. The trumpet mushrooms fell into that category this week, so when I looked in the pantry and saw a container of Arborio rice, I immediately thought of risotto. I also wanted to try a new brand of boxed fish stock as well as Better Than Bouillon fish stock base suggested by my friend, Jim Hastings. It seemed like a perfect excuse for shrimp risotto. On top of all that, the stove top smoker was still sitting on the kitchen counter after my effort at smoked new potatoes, so the stars just seemed to come together for smoked shrimp with mushroom risotto.

RECIPES

Oak-Smoked Shrimp

Ingredients

  • ¼ cup smoking chips
  • 6 large (10-15/pound) per person
  • Old Bay seasoning
  • salt and pepper

Method

  1. Prepare stove top smoker by heaping special wood chips in the middle of the smoking pan. Cover the tray with aluminum foil to make cleanup easier and insert, along with rack in the smoker.
  2. Skewer 6 shrimp. Sprinkle with Old Bay seasoning, salt, and pepper. Place on the smoker rack, and close the top, leaving an opening of about 3 inches.
  3. Place the smoker over two burners of the kitchen range, both set to medium flame.
  4. When smoke begins to come out of the lid opening, close tightly and smoke for 20 minutes.
  5. Remove the smoker from the stove, open the lid, and remove the shrimp.If they do not appear to be done, replace the smoker lid and place over the flame for another 5 minutes.

Trumpet Mushroom Risotto

Ingredients

  • 2 tablespoons olive oil
  • ¼ cup shallot finely chopped
  • 1 cup Arborio rice
  • 2 quarts seafood stock made by dissolving 2 teaspoons Better than Bouillon fish stock base in 2 quarts water (or use canned fish stock or your own home-made fish stock diluted 1:4 with water)
  • 1 pint container of trumpet mushrooms
  • 2 tablespoons unsalted butter
  • salt and pepper to taste

Method

  1. In a medium sauce pan with lid, heat the oil over a medium-low flame. Add the shallots and sweat, covered, for about 5 minutes.
  2. Add the rice, and raise the flame to medium, stirring constantly until the rice becomes opaque but does not brown.
  3. In the meantime, bring the fish stock to the simmer over another flame.
  4. Add one ladleful of stock to the shallot-rice mixture and raise the heat to bring to the boil.
  5. Stir frequently (constantly) until the liquid has almost completely evaporated. Then add another ladleful of the stock and again stir until nearly evaporated. Repeat the process until the fish stock is used up or the rice is creamy and tender, about 30 – 40 minutes  . If you need more liquid to finish cooking the rice, use water.
  6. In the meantime, melt the butter in a small skillet over medium heat. Add the mushrooms and sauté for 5 minutes. Set aside.
  7. When you are ready to serve, stir the mushrooms into the risotto. Adjust the seasoning with salt and pepper. Top with the smoked shrimp and serve. There should be enough risotto for 2 to 4 persons, depending upon hunger.

8 Comments

Filed under Food, Photography, Recipes

SMOKED NEW POTATOES AND CARAMELIZED GARLIC AIOLI

Here’s another idea I lifted from Bar Tartine. Their smoked potatoes with black garlic are unique and delicious. I couldn’t possibly replicate them at home. First, because I don’t have black garlic, and second, I don’t have a clue as to how they smoke their potatoes. As to the black garlic, you can order it from Blackgarlic.com in Hollister, CA, near the garlic capital of the world – Gilroy.

Still, an effort was worth a try, especially if I dragged out my Camerons Stovetop Smoker. The smoker is one of the niftiest things in my batterie de cuisine even though I don’t use it that much. With it, I can hot smoke fish, poultry, meat, and anything else you can fit into it without filling the house with smoke. The smoker is available from the manufacturer, Amazon, kitchen stores, and several big-box retailers for under $60.

Camerons also sells wood chips specially sized for the smoker. The wood chips that you find in the barbecuing section of the grocery store are too big. But Camerons gives you a choice of apple, alder, cherry, hickory, maple, mesquite, oak, pecan, and even corn cob. I used alder, and I think it was a good choice.

As a substitute for the black garlic, I smoked fresh garlic with the potatoes in the hope that it would caramelize and then used for an aïoli. That turned out to be reasonably successful.

RECIPES

Smoked New Potatoes

Ingredients

  • 1/3 cup special smoker wood chips
  • 6-8 small new red potatoes for each diner, well-scrubbed
  • 3 tablespoons butter, melted
  • coarse Kosher salt

Method

  1. Prepare the smoker by placing the wood chips in the center of the bottom of the smoker. Line the tray with aluminum foil, and arrange it and the rack in the smoker.
  2. Arrange the potatoes on the rack with the garlic in a small aluminum foil nest in the center (see below)
  3. With a brush, lightly baste each of the potatoes on all sides and sprinkle generously with the salt.
  4. Slide the cover onto the smoker, leaving a 3 inch opening. Place over medium heat on the stove top. When smoke begins to come out of the opening, close to form a tight seal. You will be able to smell the smoke, and you may see a faint wisp, but there should be no smoke coming out of the sealed smoker.
  5. Roast for 45 minutes. Remove the smoker from the heat, and open the top.
  6. Transfer the potatoes to a serving bowl

Caramelized Garlic Aïoli

Ingredients

  • 6 cloves of garlic, peeled and stems removed
  • 1 cup mayonnaise
  • juice of ½ lemon
  • salt and pepper to taste

Method

  1. Crumple a sheet of aluminum foil into a small “nest” large enough to hold the garlic. Set the nest in the center of the potatoes on the smoker rack.
  2. Smoke according to directions above.
  3. When the potatoes are smoked, transfer the garlic to a small bowl and mash with a fork or pass through a garlic press.
  4. Stir in the mayonnaise and lemon juice. Adjust the seasoning with salt and pepper
  5. Serve as a dip with the potatoes.

7 Comments

Filed under Food, Photography, Recipes, Restaurants

BRINED ROOT VEGETABLES AND CAULIFLOWER

Here’s my take on the brinded vegetables served at Bar Tartine. Even though mine are not nearly as good as those at the restaurant, they have turned out ok.

This exercise began at the farmers market. One of the vendors we especially like had some freshly-dug parsnips. That got me to thinking about brining some root vegetables, and I found some turnips and carrots at the grocery store. I couldn’t find anything green – I guess broccoli would have worked – so I settled on a mix of the four.

Then, of course, I had to drag out my Harsch Steinzeug sauerkraut crock. The task also gave me the opportunity to try out my copy of “The Art of Fermentation” by Sandor Ellix Katz. My daughter, Carol, had given me the book as a gift, and I was so pleased because it has become a classic and the “standard” on the topic in just the short two years since it has been published. The only other things I needed were some Kosher salt and water.

My crock is 5 liters, which is just the right size for me, but it comes in larger and smaller sizes as well. If you haven’t seen a Harsch Steinzeur crock, it is a thing of beauty with a gleaming brown glaze, shaped handles, and a straight-sided lid with a stylish knob on top. It is also an example of German ingenuity and practical design. During my childhood, my grandmother made crocks and crocks of sauerkraut. The process was tedious and odoriferous. As well, skimming the scum off the top of the crocks took lots of attention for weeks.

My crock overcomes all of those problems. Inside are two half-moon weights that fit tightly together to keep whatever you are brining submerged. There are notches in the rim to provide escape for carbon dioxide, and there is a shallow trough around the lip that you fill with water to form an air-tight seal. That cuts down on the smell of fermenting vegetables. Once you have your system set up, and the vegetables start to ferment, you will hear an occasional “frog croak” as a burp of carbon dioxide escapes. That’s reassurance that things are going alright.

Some briners are careful to weigh out the salt and to balance it with enough water to make a brine of specific concentration, but you don’t need to do that so long as you make sure to add enough salt to make a good brine. Even though I peeled the vegetables, you don’t have to do that either, but I thought they would be more attractive with their peelings gone – especially the turnips and rutabegas.

I harvested my vegetables after about ten days of brining. They were still crisp with a briny, slightly pickled taste. If you want a stronger pickle, you can brine them longer, and you can check from time to time to see if the vegetables are to your liking. Just remember when you repack the crock to charge it with more salt and water and to seal the lid with water as you did at the beginning of the process.

So here’s what I did:

RECIPE

Brined Root Vegetables and Cauliflower

Ingredients

  • 3 parsnips, peeled and cut into chunks
  • 3 rutabagas, peeled and cut into eighths, lengthwise
  • 3 turnips, peeled and cut into discs
  • 4 large carrots, peeled and cut into chunks
  • 1 head cauliflower, cut into florets
  • Kosher salt
  • water

Method

  1. Prepare the vegetables
  2. Arrange a single layer of mixed vegetables on the bottom of the crock. Sprinkle generously with salt.
  3. Repeat the process, layer by layer, until you have used all of the vegetables
  4. Arrange the half-moon weights so that they fit together and the vegetables are covered.
  5. Add water to cover the weights with at least two inches
  6. Place the lid on top of the crock, and move to a cool place out of the way of your cooking.
  7. When the crock is in place pour water into the groove around the lid and go about your business
  8. Check the level of water around the lid on a daily basis. Fill with more water if needed
  9. After about 4 4 days listen for the “burp”
  10. You should probably plan on at least 10 days before you check the vegetables. That will be a good time to remove any scum that might have formed on the weights, although there will probably be none or very little because of the air-lock system. If you want to brine the vegetables longer, sprinkle the top of the vegetables with more salt, adjust the water level, and replace the weights. Refill the watereseal around the lid and let the process work for another week.
  11. Remove and serve the vegetables whenever they suit your taste.

Leave a comment

Filed under Food, Photography, Recipes, Restaurants

GINGER-SCENTED BUTTERMILK PANNA COTTA

In a previous post, September 10, 2013, I wrote about Sarah’s panna cotta recipe and added some images of her making it and a berry topping down in the basement prep area of Rich Table. That version uses fresh buttermilk from the restaurant that is a byproduct of their house-churned cultured butter.

This is a slightly different version of the panna cotta using commercial buttermilk and ginger as the principal flavoring. I used it as the centerpiece of the dessert for our recent pot luck birthday party: ginger-scented panna cotta with cajeta and sea-salt-sprinkled chocolate sables.

It is very easy to make. The only special step is to strain the panna cotta into the ramekins to remove any bits of ginger root and undissolved gelatin.

RECIPE

Ginger-Scented Buttermilk Panna Cotta

Ingredients

  • 1¼ cups heavy cream
  • ½ cup sugar
  • 1 6-inch piece of fresh ginger root, peeled and cut into 1 inch pieces
  • 1 packet unflavored gelatin
  • ¼ cup water
  • 1½ cups buttermilk

Method

  1. In a medium saucepan over medium heat, combine the cream and sugar. Bring to a boil, stirring until the sugar is dissolved. Add the ginger root pieces and simmer for 15 minutes
  2. Meanwhile, sprinkle the gelatin over the surface of the water in a small bowl. Let stand for 5 minutes to soften the gelatin.
  3. Stir the softened gelatin into the simmering cream mixture and stir vigorously until the gelatin is completely dissolved.
  4. Add the buttermilk and simmer gently for another 10 minutes, stirring frequently.
  5. Remove from the heat, cool for a minute or two, and then strain into six 6-ounce ramekins
  6. Cool to room temperature and then cover each ramekin with plastic wrap. Refrigerate overnight.


3 Comments

Filed under Food, Photography, Recipes

SEA-SALT-SPRINKLED CHOCOLATE SABLÉS

Rich Table changes its dessert menu almost on a weekly basis, so chocolate sablés are on and off the list. But they are never off for long because they are so popular, and the restaurant regulars insist on them. These tasty little sandy cookies (Sablé is the French word for “sandy”.) are a great way to end a meal, especially when combined with ice cream, a light mousse, crème brûlée, or panna cotta.

The texture of the cookies is sandy because the ingredients are mixed together very lightly so that the crystals of sugar do not completely dissolve, so be careful not to over-work the dough.

This particular version adds a light dusting of smoked sea salt. I used smoked Halen Môn, a Welsh sea salt harvested on the Isle of Anglesey from whence my great-grandfather and great-grandmother migrated many decades ago.

It is interesting how well chocolate and salt seem to go together. You certainly see the effective combination in these cookies, but also increasingly in ice cream and chocolate bars.

Unfortunately, this is not Sarah’s authentic recipe, but it is pretty close to the real thing. The cookies are fairly easy to make, although there are several steps, and there are a couple of tricks along the way. These were a big hit at our recent potluck birthday party.

RECIPE

Sea-Salt-Sprinkled Chocolate Sablés

Ingredients

  • 3 ounces bittersweet chocolate
  • 1¼ cups flour
  • 1/3 cup cocoa
  • ¼ teaspoon baking soda
  • ¼ teaspoon sea salt
  • 11 tablespoons unsalted butter, softened
  • 1 cup sugar
  • 1 large egg yolk
  • water
  • smoked sea salt (Halen Môn or your favorite brand)

Method

  1. Place chocolate in freezer compartment of refrigerator for 10 minutes. Then grate onto a sheet of waxed paper using the fine side of a box grater. You will generate static electricity with the grating, so “ground” the gratings by touching them before you pour them into a bowl. Set aside.
  2. Whisk together the flour, cocoa, baking soda and sea salt.
  3. In a medium bowl, mix the butter and sugar together with an electric mixer until just combined. Do not over-beat. Then mix in the egg yolk.
  4. Add the dry ingredients and mix together briefly until just combined. Do not over-beat.
  5. Fold in the grated chocolate with a spoon or spatula.
  6. Squeeze the dough into a ball with your hands. The warmth of your hands should melt the butter slightly so that the dough comes together.
  7. Place the dough in the middle of a 16 inch long piece of waxed paper. Shape the dough into a log about 14 inches long,  3 inches wide, and 1 inch high, along the length of the paper.  Fold the waxed paper over the log, pressing the paper firmly against the dough. With the palm of your hand, flatten the log slightly so that it forms an oblong in profile.
  8. Refrigerate for 1 hour or more.
  9. While the dough is chilling, heat the oven to 350°F,  and line two cookie sheets with parchment paper.
  10. Remove the chilled dough from the refrigerator and cut into 1/3  inch thick slices with a very sharp knife. The dough will be very firm, so you will have to use some pressure on the knife to cut the slices.
  11. Arrange the cookie slices on the two cookie pans with at least 1 inch between them.  With a pastry brush, and in batches, moisten the tops of the cookies with a few drops of water. Sprinkle each moistened cookie with a few grains of sea salt. Chill again in the refrigerator for 15 minutes.
  12. Bake in the middle of the pre-heated oven for 10 to 12 minutes. Remove from the oven, cool on the pans for 5 minutes, and then transfer to baking racks until completely cooled.
  13. Serve. Makes about 24 oblong cookies.

6 Comments

Filed under Food, Photography, Recipes, Restaurants

CAJETA

It’s May! And I think that Spring may be here. Lots of flowers are in bloom, but we have experienced freezing weather for the last week. As well, it is a month of birthdays: three of our circle of friends are having birthdays within a week of one another, so we are planning a mass celebration. I am making the dessert. My plan is to make takeoffs from Sarah’s Rich Table desserts – salted chocolate sablés and buttermilk panna cotta. Neither of these is an authentic recipe from Sarah (Do you think Dad could talk her out of trade secrets?) but they should be close. I also plan to gild the lily – it is Spring, remember? – with Mexican cajeta to pour over the panna cotta.

The recipe for cajeta comes from the superb cook book, Authentic Mexican, by Rick Bayless and Deann Groen Bayless (William Morrow and Co., New York, 1987, p 293). Even though the recipe calls for regular white sugar, in the past I have used piloncillo, the small cones of unrefined sugar that you can find in Mexican and Central American markets. This time, though, I decided to go with turbinado. The other decision was whether to use goat’s milk or cow’s milk. The authentic version calls for goat’s milk, and it is easy to buy from the stalls selling goat cheese at the farmers market or in cartons at health food groceries, so I went with that.

The only tricky things about the recipe are: (1) don’t let the mixture boil over when you add the baking soda, (2) stir occasionally so that it doesn’t burn on the bottom, and (3) watch for the change in the size of the bubbles as it boils, because that is the sign to let you know it’s almost done.

Cajeta is akin to caramel or butterscotch sauces, and it can be used in exactly the same way. It is delicious over ice cream, fruit, cake, etc. I guess you could just eat it straight out of the bowl, and some folks probably do.

RECIPE

Cajeta

Ingredients

  • 1 quart goat’s milk
  • 1 cup turbinado sugar
  • 1 tablespoon light corn syrup
  • 1½ inch stick of cinnamon
  • ¼ teaspoon baking soda dissolved in 1 tablespoon water
  • 1 tablespoon light rum

Method

  1. In a large, heavy saucepan, combine the goat’s milk, sugar, and corn syrup, stirring until completely dissolved. Add the cinnamon
  2. Over medium heat, bring the mixture to the boil and then  remove from the heat and stir in the dissolved baking soda. It will foam up, so stir it vigorously to prevent boiling over.
  3. Return to the heat and adjust the temperature so that it simmers gently with a low boil. Stir frequently from the bottom of the pan to prevent scorching.
  4. Check frequently and stir. After about 30 – 45 minutes, the mixture will have reduced to about half or less, and the bubbles on the surface will change in size and become more glistening.
  5. Turn down the heat to medium-low, allowing the mixture to reduce still further, but stirring very frequently to prevent burning.
  6. When it has thickened sufficiently  – it should coat the spoon but still be fluid – remove from the heat. Cool for a few minutes, and then stir in the rum.
  7. Allow to cool completely and then transfer to a serving dish or to a wide-mouthed jar. It can be refrigerated for later use, but reheat gently before serving.

7 Comments

Filed under Food, Photography, Recipes

LIPTAUER CHEESE

In a recent post, I described an amazing feast we enjoyed at Bar Tartine in San Francisco. One of the co-chefs, Cortney Burns, is featured in an article titled, “Dairy Queen” in the Spring, 2014 issue of Culture: the Word on Cheese, a beautiful quarterly magazine all about cheese. Before our recent visit to the restaurant, Sarah and Evan said we should be sure to get the Liptauer cheese spread. Unfortunately, it was not on the menu that night, so we didn’t get to give it a try. I’m not sure, but I suspect that Cortney is behind the spread being on the menu because of her obvious interest and expertise in cheese. Liptauer cheese, like the pimento cheese I wrote about a while back, is a classic from earlier days, commonly seen at cocktail parties. I guess with the renaissance of cocktails, there is a renewed interest in cheese spreads as well. Liptauer cheese is the name for both the soft, fresh, sheep’s milk cheese originating in Liptauer, Hungary, and the seasoned spread made and enjoyed in Austria, Germany, and other European countries.  You probably won’t be able to find the original Liptauer cheese at your local cheese monger, but fortunately you can make a reasonable facsimile using cottage cheese or cream cheese. If you want to turn your spread into a dip, just add enough sour cream to suit your taste. Also, for some tastes, this version may be a little bland. You can spice it up with cayenne or your favorite hot pepper sauce to taste.

RECIPE

Liptauer Cheese

Ingredients

  • 8 ounces cream cheese, softened
  • 1 stick butter, softened
  • 1 tablespoon Dijon mustard
  • ½ teaspoon salt
  • ¼ teaspoon ground black pepper
  • anchovy filet, mashed (or about 1 inch of anchovy paste)
  • 1 tablespoon paprika
  • 1 tablespoon caraway seeds
  • 1 tablespoon capers, chopped
  • 1 tablespoon chives, minced
  • 1 tablespoon green onion tops, chopped
  • 2 tablespoons finely chopped cornichons
  • 2 tablespoons finely chopped flat-leaf parsley
  • cayenne or pepper sauce (optional, to taste)
  • finely chopped chives or green scallions or paprika for covering the cheese ball.

Method

  1. In a food processor, pulse the cream cheese and butter until smooth.
  2. Transfer to a bowl and stir in the remaining ingredients until evenly combined.
  3. Refrigerate until firm, at least two hours or overnight. When firm, shape into a ball and cover in plastic wrap. Chill again.
  4. Roll the chilled cheese ball in chopped chives or green scallion tops (I used a mixture of garlic chives and scallions. Alternatively you can roll it in paprika.)
  5. Serve at room temperature with fresh, crusty bread – preferably dark rye – or crudités.

8 Comments

Filed under Food, Photography, Recipes, Restaurants

THE MUFFULETTA AND THE CENTRAL GROCERY IN NEW ORLEANS

A while back I posted a recipe for olive salad that approximates the one that is used at the Central Grocery in New Orleans. Then I started reading Yelp reviews (which I try to avoid at all costs) and recipes on the Internet. All of that inspired me to write about what is said to be the “Original Muffuletta” and the Central Grocery.

First, there are Yelp complaints that the Central Grocery is dirty. C’m’on folks, the store is on Decatur Street in the Vieux Carre (the French Quarter). It is as old and as down at the heels as all of the other buildings in the neighborhood. At least one history says that the store was founded in 1906. It has probably operated non-stop ever since, except during severe hurricanes. Besides, a visit gives you the opportunity to wander the aisles and see some amazing food choices, like Bombay duck – not a duck at all, but rather a long dried fish with fearsome eyes and teeth – sticking out of a barrel,  and Italian delicacies hard to find elsewhere.

Then, some yelpers complain about rudeness of the men who make the sandwiches. I guess those reviewers have never been to Katz’s or Russ and Daughters on East Houston in Lower Manhattan. It is true that you need to be ready to order when you get to the front of the line, but the men are as friendly as I would be if I made sandwiches all day long.

Some recipes on the Internet call for lettuce or tomato. That doesn’t work, because then the sandwich becomes a sub or a hero. Some say that there are better versions elsewhere. I don’t know about that, but remember that the original is the original. The only place I know of that has a comparable sandwich is Fertitta’s in a seedy part of Shreveport, LA. Fertitta’s calls its sandwich “the Muffy”, and they make claims to being the original.

Whichever, the tale about the Central Grocery is that around 1906, Italian workers started coming to the grocery with lunches of cheese and meat. The owner of the Central grocery suggested putting the lunches in loaves of muffuletta, a Sicilian bread, and the muffulletta sandwich was born. Probably apocryphal, but it makes a good story.

These days the sandwich is sold as a whole or a half, and the whole is cut into fourths before being wrapped in butcher paper.  That’s really enough for four people, but many customers eat the whole thing. The paper gets olive oil stains all over, and that’s when you know the sandwich is ready to eat. Boxes and barrels are used as seats and  scattered around the crowded store, but you probably want to take a brief walk to Jackson Square and enjoy your lunch al fresco on a sunny day.

Bread. To me, the bread is an essential part of the successful muffuletta. The loaves at the Central Grocery are delicious, and in my experience only available in Louisiana, especially New Orleans. Schlotzky’s makes a reasonable substitute. Recently I discovered that the 9 inch focacchia loaf from Panera Bread makes another suitable choice.

Meat. You can choose whatever you like. Mortadella – a good mortadella and not plain “baloney” – is almost a requirement as is salami (I used Genoa). Ham is also important. A good Italian coppacola is my favorite, but any thinly sliced delicatessen-style ham can be used.

Cheese. Provolone and/or mozzarella are classic choices.

RECIPE

Central Grocery Style Muffuletta

Ingredients

  • 1 loaf, Panera Bread loaf, split in half
  • 1 batch Louisiana olive mix
  • ½ pound each, mortadella, salami, and ham
  • ¼ pound Provolone or mozzarella

Method

  1. Spread the cut halves of the bread generously with olive salad mix
  2. Add generous layers of meat and cheese and top with the top half of the bread loaf.
  3. Cut in four quarters. One quarter should serve most adults.

16 Comments

Filed under Food, Photography, Recipes, Restaurants

EATING MY WAY THROUGH SAN FRANCISCO – BAR TARTINE

Recently we were visiting in San Francisco around the time of the birth of Sarah and Evan’s second child. By the way, it’s a boy! During our visit we, of course, paid a visit to Rich Table and had a great meal. But the night that Mommy and the new brother came home from the hospital, we wanted to make it a special family evening, so Susan and I went to Bar Tartine in the Mission district.

The restaurant is part of the Tartine group operated by Elisabeth Prueitt and Chad Robertson of Tartine Bakery fame. The co-chefs at Bar Tartine are Nick Balla and Cortney Burns, who are friends with Sarah and Evan. To help us celebrate the new baby, they really pulled out the stops to make it a memorable evening for us as well as for our family. They certainly did that!

The bread on the table was freshly baked  famous Tartine Country Loaf baked by Chad Robertson himself. The bread is one of the best in San Francisco. I say one of the best because Sarah makes a killer loaf of Douglas-fir scented levain for Rich Table.

Of course, we followed Sarah and Evan’s recommendations for what to order, though to tell the truth, I don’t think you can miss on ordering anything on the menu.

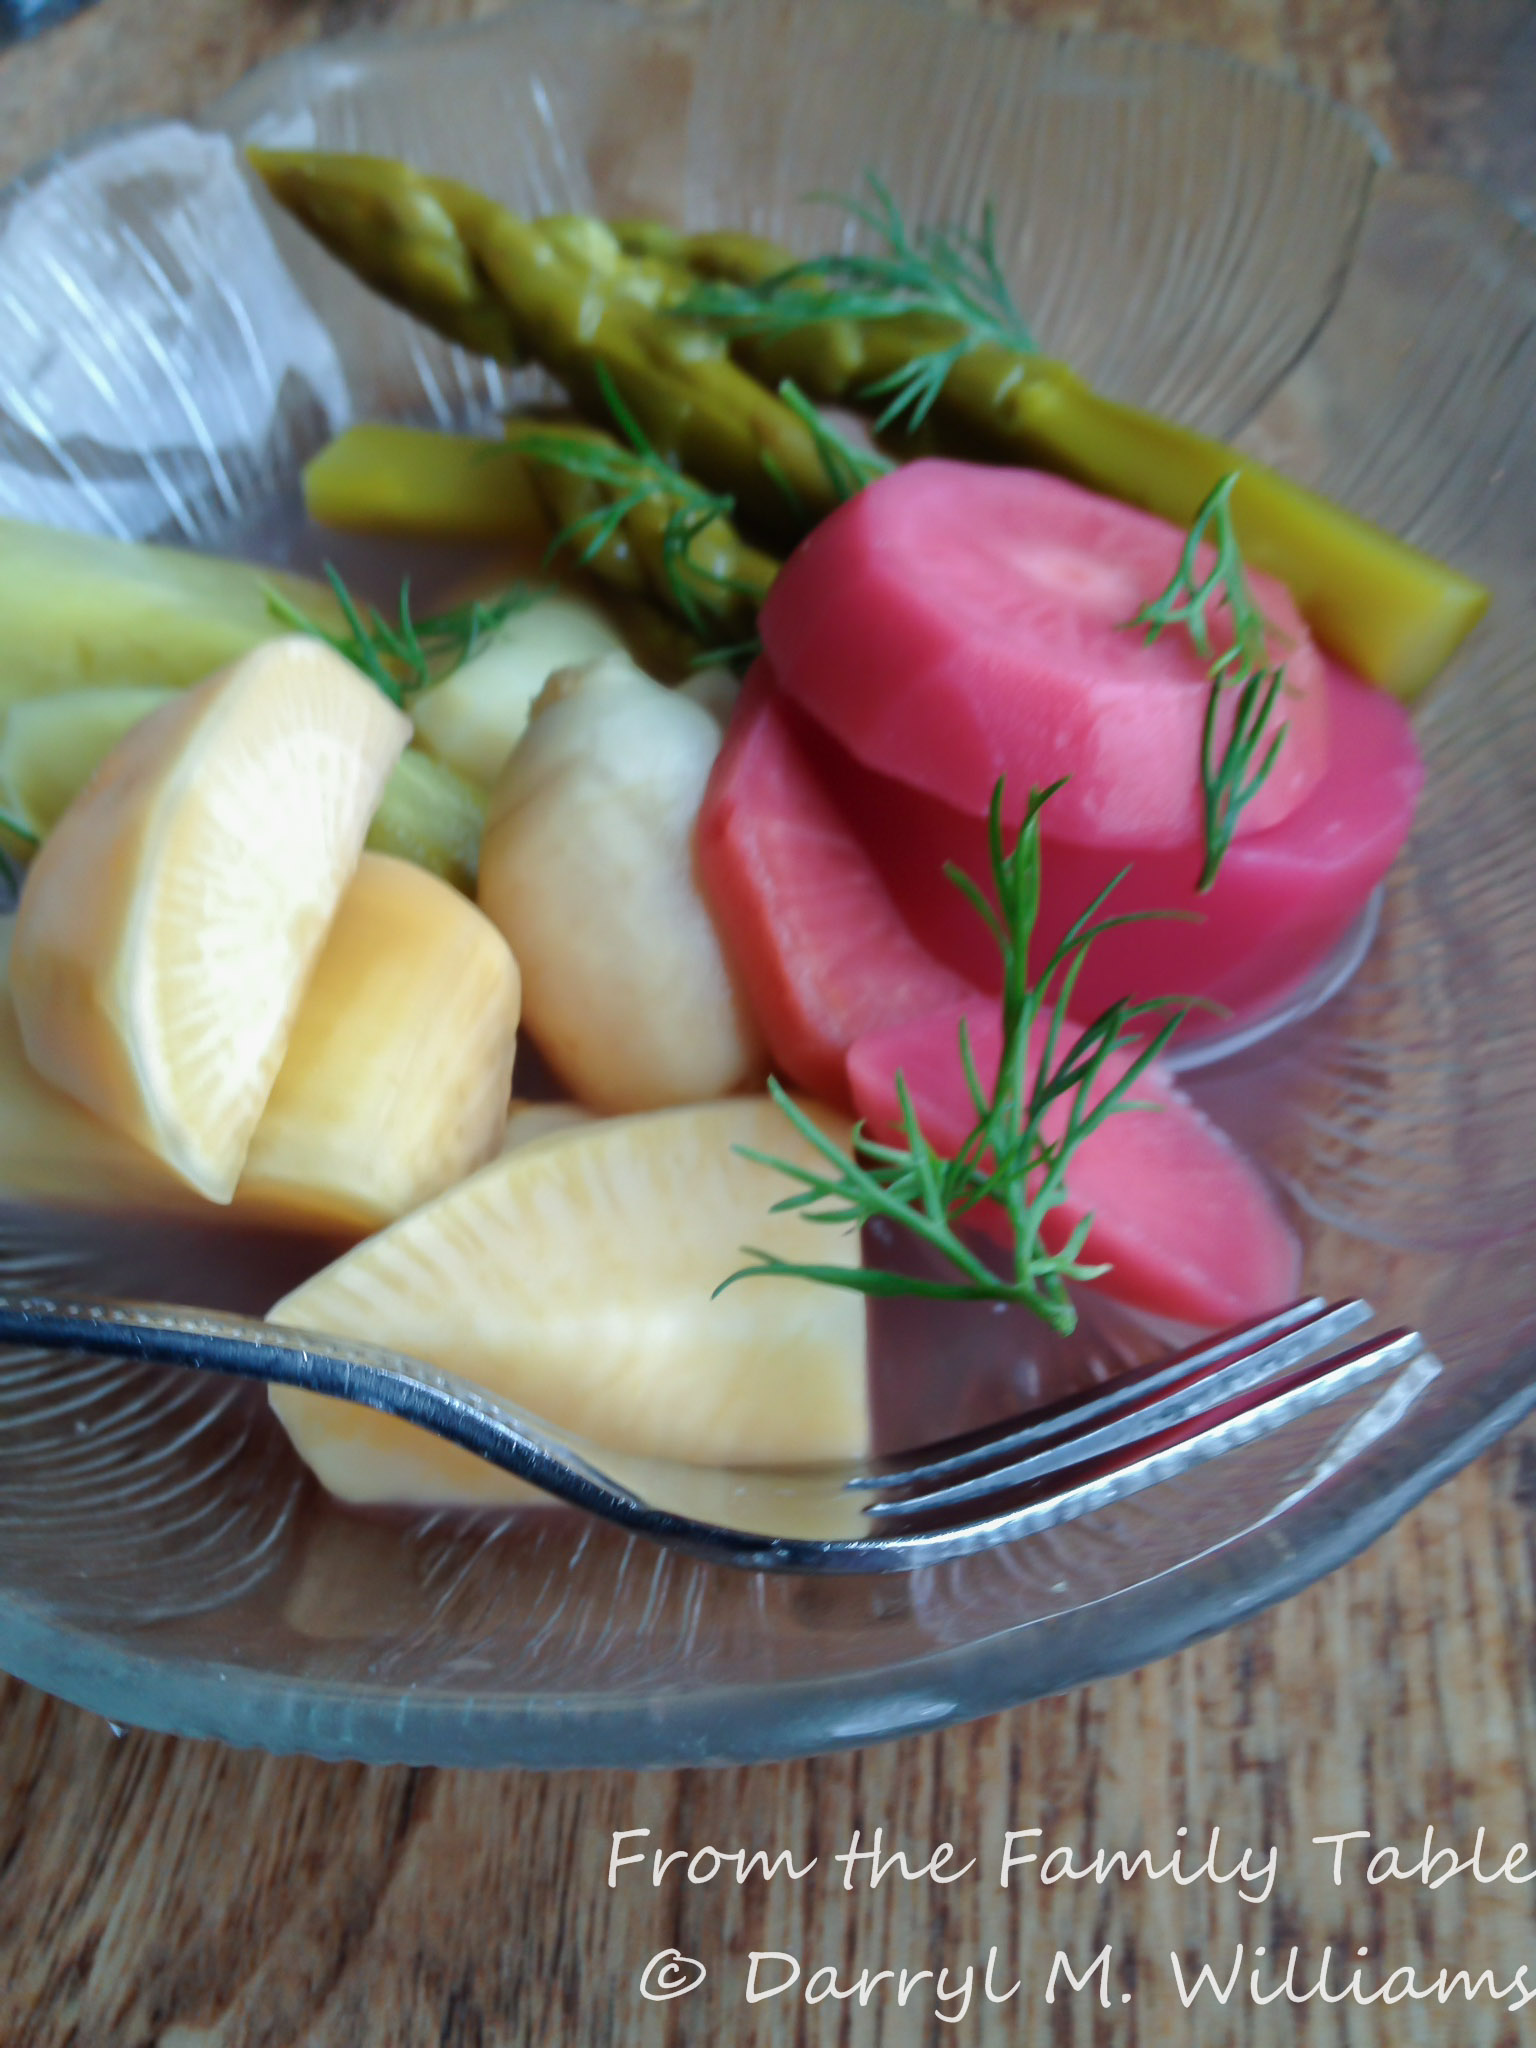
The brine-pickled vegetables are deceptively simple. A colorful plate of root vegetables comes to the table and you find immediately  that the fresh tastes and crunch  of each has been preserved even with a tangy, lightly pickled overtone.

Bar Tartine Brine pickled vegetablesThe potato flatbread with garlic and sour cream is a must. The beautiful presentation makes it almost too pretty to eat – almost, because when you take a bite, the flavors come together and literally seduce you to finish the whole thing.

Bar Tartine Potato flatbreadThe smoked potatoes with black garlic are very unusual. If you don’t like smoked foods, then don’t order them, because they are definitely rich with fresh wood smoke. The black garlic adds its own overtones. It is very popular in restaurants in the Bay Area as well as the whole country. It has been used in Asia for centuries as a food and as a health supplement, but it was commercialized in the US by Scott Kim. He says the garlic is fermented in conditions of controlled heat and temperature while others say it is not fermented but rather deeply caramelized by the Maillard reaction over several weeks. Whatever the process, the result is garlic that turns inky black,  given up its pungency, and gained a rich flavor that has been said to have elements of molasses, chocolate, and umami. Kim now provides the black garlic from his operation in Hayward, CA.  (Just down the road from Gilroy, the self-proclaimed “Garlic Capitol of the World”. ) You can learn more about the product or even order your own from Blackgarlic.  I can’t imagine someone not liking the very earthy flavor of this creative dish. The whole new potatoes are  beautifully garnished, tender and very tasty. Unfortunately my shaky image doesn’t do them justice.

Bar Tartine Smoked potatoesThe beet and blue cheese salad comes  beautifully presented. Now, I am not a big fan of beets in any form, but this salad makes even me a believer. The beets are sweet as they always are, but that plays off the blue cheese so well.

Bar Tartine Beet and blue cheese saladThe beef tartare on koji (an Asian “yeast” – a form of Aspergillus used to ferment various foods including miso, soy sauce, and sake) toast with bottarga (salt-cured fish roe) is beautiful. Fortunately we had a very informed server who filled us in on all of the ingredients. This is unlike any other beef tartare you have ever eaten.

Bar Tartine beef tartare
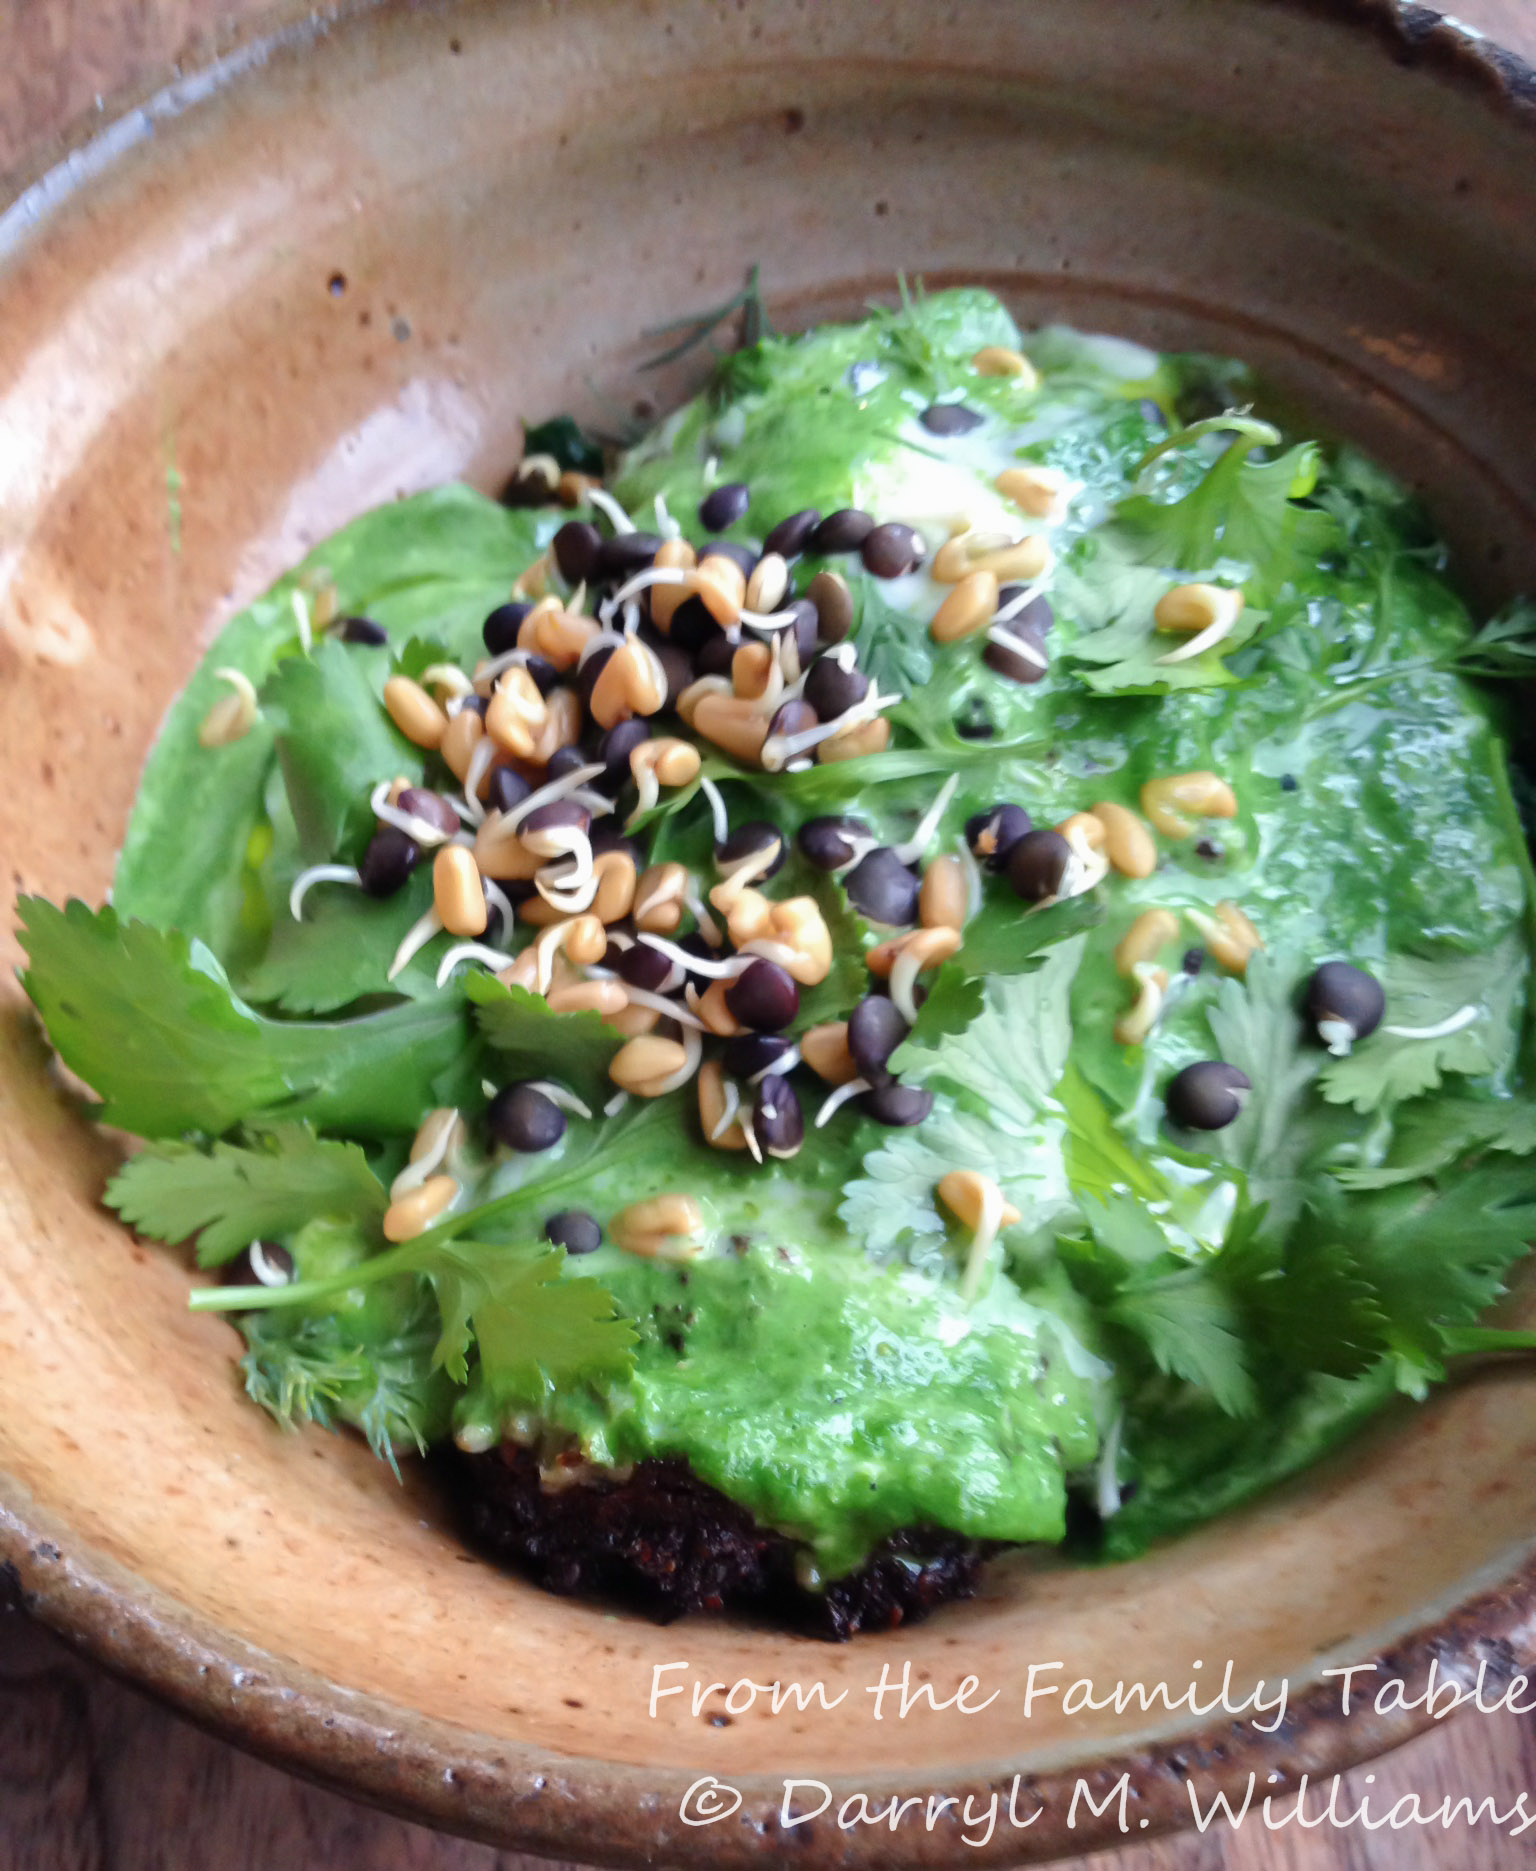
I’ve eaten lentils lots of different ways, usually in a dal or soup, but never sprouted, so the visual impact of the sprouted lentil croquettes with kefir and coriander is spectacular, and the taste is unlike any of those other lentils that I have eaten.

Bar Tartine Sprouted lentil croquettesMy green chili fisherman’s stew with collard was very spicy – much too spicy for Susan – but it came as an emerald-green broth filled with seafood and hen-of-the-woods mushrooms. And collard!! When one is used to the limp, damp clot that’s called collard greens in a Southern cafeteria line, you are unprepared for the lovely, delicious variation presented in this dish.

Bar Tartine Fisherman's stew
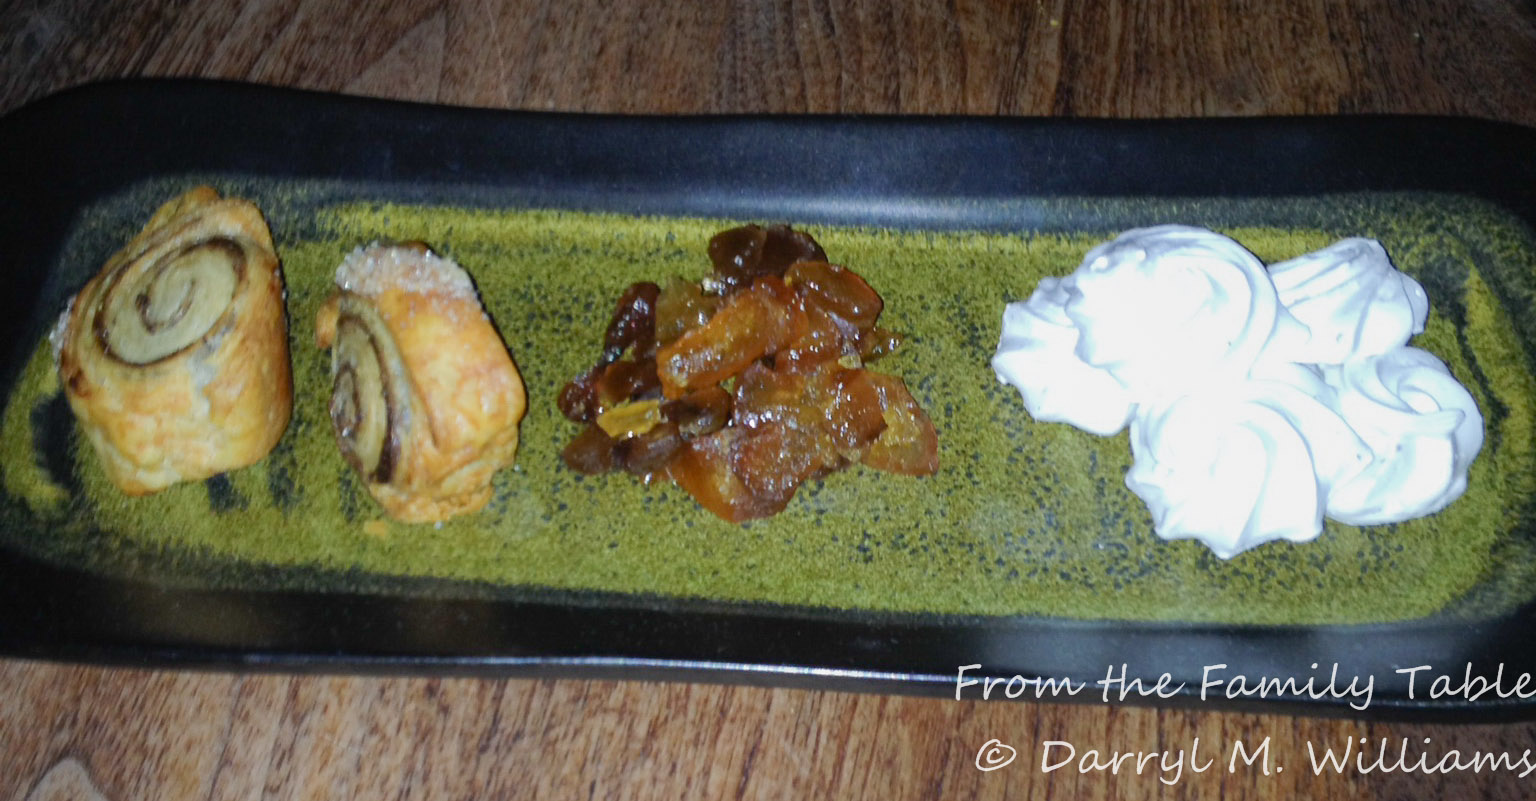
Hard as it is to believe, we had room for a little dessert “amuse” of meringues, rugalach, and candied fruit along with a complex carob mousse with goat cheese and black walnuts.

Bar Tartine kugeleh and meringuesBar Tartine Carob mousseAfter such an incredible feast we went back to our beds. In the meantime, the new family had their own very special celebration, and two new brothers got acquainted.

6 Comments

Filed under Food, Photography, Restaurants, Travel