Monthly Archives: December 2015

BRISKET AND LATKES

We are in the midst of our final family visit for the holiday season. Our son, his wife, and their two daughters are visiting from Silicon Valley. We had a couple of days of quiet, and now there is once again pandemonium. We enjoy it.

The family arrived the day after Christmas. We had old fashioned New Mexico posole, as we weren’t sure when they would arrive with all of the bad weather in this part of the country.

The next night, we celebrated our son’s new position with champagne, blinis, sour cream, and salmon roe. Then Christmas crackers for the girls. Finally, brisket that had been cooking all day and served with potato latkes along with green beans and mushrooms. It was a festive evening, indeed.

The recipe for brisket is Susan’s. She got it from a friend many years ago when we lived in Houston. Since then, it has been a big family hit. Sarah took the recipe with her to New York City where she often made it for family meal in the restaurants where she worked. She says that whenever it was served, cheers went up from all of the cooks and servers. The secret to success is long, slow, braising with flavorful seasonings. Plan on at least 10 hours of cooking after an overnight marinade.

My daughter-in-law makes wonderful latkes, so I faced that challenge with a little trepidation. There are lots of recipes out there for latkes, and most folks are convinced that their mother’s are the best. I have modified the recipe in Amanda Hesser’s The Essential New York Times Cook Book (W.W. Norton & Co., New York, 2010). The book is an outstanding modern replacement for Craig Claiborne’s classic, The New York Times Cook Book. The latkes got my daughter-in-law’s approval, so I guess they were alright.

RECIPES

Brisket

Ingredients

  • 2 tablespoons liquid smoke
  • 2 tablespoons Worcestershire sauce
  • 1 teaspoon garlic salt
  • 1 teaspoon onion salt
  • 1 teaspoon celery seed
  • salt and pepper
  • 4-6 pound brisket, trimmed

Method

  1. Combine the liquid smoke, Worcestershire sauce, and seasonings in a flat roasting pan
  2. Marinate the brisket in the marinade, covered, overnight in the refrigerator. Turn occasionally, and pierce the meat with a fork to make sure the meat absorbs the marinade
  3. Place the pan, covered, in the middle of an oven set at 200°F. Cook at least 10 hours, turning frequently. Adjust seasoning with salt and pepper.
  4. When well done, remove from the oven, slice on the diagonal thinly, and serve immediately. Should serve 4 to 6.

Potato Latkes

Ingredients

  • 2 large russet potatoes, peeled
  • ½ large yellow onion
  • 2 jumbo eggs, separated
  • 1 tablespoon potato flour
  • 2 teaspoons salt
  • 1/8 teaspoon ground black pepper
  • 1/8 teaspoon ground white pepper
  • peanut oil for frying

Method

  1. Grate the potatoes and onion. Purists will insist on a grater. A food processor fitted with the grater blade is the fast way.
  2. With your hands, squeeze as much of the liquid from the grated potato-onion mixture as you can. Transfer the mixture to a large bowl.
  3. Stir the egg yolks, potato flour, salt, and pepper into the mixture, using your hands to make sure the ingredients are evenly combined.
  4. Beat the egg whites until they form stiff peaks. Fold into the potato mixture.
  5. In a large cast iron skillet, heat about ¾ inch of peanut oil until it casts a sheen. In handfuls, drop the potato mixture into the hot oil being careful not to burn your hands. Fry until the bottoms of the pancakes are golden brown. Turn carefully and fry the other side until it is golden. Remove from the oil. Drain on paper towels. Serve immediately while still warm. Makes about 8 large latkes.


10 Comments

Filed under Food, Photography, Recipes

ViVO GALLERY – ART AND POETRY

For the last several years, ViVO Contemporary Gallery on Santa Fe’s famous Canyon Road has staged an interesting show in which local poets (of which there are many!) compose and read a poem related to works of one of the nine artists who are members of the coöperative that owns the gallery. I have been fortunate to have been asked to participate in the project for several years.

Two years ago, I worked with Joy Campbell who fashions sculptures from old books. She folds the pages of the books into intricate shapes that merge into beautiful and amazing constructions.


Here is the poem that I contributed to give a verbal link to Joy’s lovely work:

Old Books

Folded.
Folded again and again
until words disappear
and letters turn to lacy ribbons
hiding the work of
poets and professors who
had filled glacier-white pages
with thoughts and ideas
they hoped would last forever.
Black lines trapped their musings,
held for all to see,
bound together, edged in gold,
scented with sweet musk of leather.

Pages yellow, words fade,
and the book becomes a tattered relic
on a high shelf – the words forgotten.
Just when the trash heap seems certain
there is new life.
Pages, words are folded on themselves,
lost from sight and touch.
In their place are
phantasmagorias, towers of Babel
that transcend language,
visions not communicated
by words alone.
The creator knows what I can only guess.

My memories are inky letters on a page,
engraved upon
the convolutions of my brain and buried
deep within the fissures.
Those memories grow more difficult
to see and hear.
At times they disappear,
hidden by ribbons woven
of spider webs and mold.
Still, they are not ready to be discarded,,
and ask to be transformed, renewed,
if that is possible.

The Creator knows what I can only guess.

This year I am working with Vincent Faust, a sculptor whose media are hunks of steel, metal pipes, cables, and steel rods. His tools include welding torches and foundry equipment. He finishes his pieces with an industrial process that uses powdered pigments. The results are incredibly complex pieces in vibrant colors.

I don’t know yet what my poem will be. I only hope it grabs the ear as strongly as Vince’s sculptures grab the eye.

4 Comments

Filed under Photography

CHOCOLATE BIRDS’ NESTS

Whenever grandchildren visit, we try to find something that they can help cook. They enjoy being in the kitchen, and it is fun to watch them having a good time. For 18-month- and four-year-olds, the recipes need to be fast and simple. Attention spans aren’t long at those ages. The recipes should also be mess-less, but that is usually not possible.

We have made these candies for years, going back to when our own children were little. Simple they are; mess-less they are not. I guess that licking fingers is part of the fun. The candies are always a big hit and disappear quickly after they have set up. The recipe should make about 30 candies,, more if you can make them smaller. You can add nuts or use other flavors of baking chips, but at least with our kids, nuts are not a big seller and they can be dangerous for very little ones.

RECIPE

Chocolate Birds’ Nests

Ingredients

  • 2 12-ounce packages chocolate chips
  • 2 5-ounce cans chow mein noodles
  • miniature marshmallows (optional)

Method

  1. Melt the chocolate chips over very low heat in a saucepan large enough to hold added chow mein noodles, stirring frequently to prevent scorching of the chocolate.
  2. When the chocolate is completely melted, remove from the heat, add the chow mein noodles, and stir until the noodles are completely coated with the chocolate. Stir in some miniature marshmallows if desired.
  3. By tablespoonfuls, drop the mixture into piles on sheets of wax paper. Cool for at least 2 hours or until the chocolate has become firm.
  4. Eat. If there are any left over, store in an air-tight container.

7 Comments

Filed under Food, Photography, Recipes

CHRISTMAS VISITS

This week we’ve had Sarah and her two boys – ages four and one-and-a-half – visiting. It has been a different sort of visit than Carol’s last week. A lot more Christmas excitement, visits with Santa, and games and playing.

One of the big events was the Christmas Glow at the local botanical garden. First there was the snow. None of that in the boys’ California. Everyone got bundled up, but the roaring fires set up along the paths were welcome, and we stopped at every one. The unmistakable smell of burning piñon gave a distinctive Santa Fe touch. The lighted sculptures and laser lights glowing on the snow made it magical. Hot chocolate was a favorite, and then we went home for a snack before bedtime.

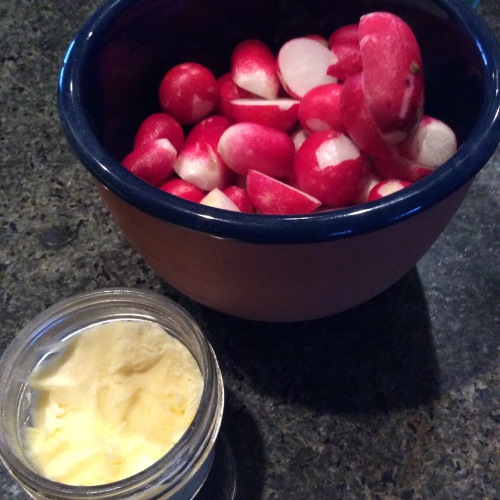
Last night, Chef Sarah made the meal. First, we stopped by the Cheesemongers of Santa Fe for the makings of a cheese plate, and then we went to the grocery store for the makings of dinner. Besides the cheese, appetizers included French breakfast radishes with Rich Table house-cultured butter and Welsh Halen Môn smoked sea salt.

French breakfast radishes with Rich Table house-cultured butter

French breakfast radishes with Rich Table house-cultured butter

Sarah selected the cheeses. My favorite was the Bent River from Minnesota, but a close second was the Alpencase. The Ameribella stood on its own.

Cheese tray

Cheese tray

The main event included baked red snapper, bucatini with green peas and guanciale, and romanesco with roasted marrow sauce. The bathroom scale this morning told the tale.

7 Comments

Filed under Food, Photography

QUICK QUICHE

This project started with a Nordic Ware 8.5 or 10 inch quiche and tart pan (not sure about the measurements – wider at the top than the bottom) that I bought from our local kitchen store for another project. The pan is a little deep for some tarts, but it is perfect for pie-like fillings, and it seemed to insist that I make a quiche. The removable bottom is convenient for unmolding the quiche, but an ordinary pie pan will work just fine.

Tart and quiche pan with removable bottom

Tart and quiche pan with removable bottom

I confess that making a quiche from scratch is usually more than I want to undertake, so this time I decided to use all of the short-cut methods I could find. This approach included buying a ready-made pie crust from the refrigerator section at the grocery store, along with pre-diced ham. I could have also used ready-shredded Swiss cheese, but shredding my own seemed simple enough.

With a little rolling, I made the pie crust big enough to fit easily into the pan. I baked it blind, so even though the crust started out at the edge of the pan, there was a little shrinkage and the sides were not as tall as they could be. I chilled the unbaked crust for a half-hour in the refrigerator to reduce shrinkage – which it did – but there was still some. The other challenge of baking blind is that you need to prick the bottom of the crust with a fork to prevent it from rising in the middle. Then, when you fill the partially baked crust with a liquid to be baked, you run the risk of leaks. I dealt with that problem by making a thick paste of flour and water so that when the crust had cooled but had not been filled, I dabbed some of the paste on all of the fork holes to seal them. No leaks, but as additional insurance I baked the filled quiche on a baking sheet. I also baked it in the pan even though one should be able to remove the pan before you bake the filled quiche. I’m just naturally cautious.

Finally, figuring out when the quiche is done is always a challenge. Usual instructions include stabbing the center with a knife to see if it comes out clean, or jiggling the quiche to see if the center is too liquid. You don’t have to do either of those tricks. If you watch carefully while the quiche is baking you will notice that it first begins to firm up around the edges in a ring, and that ring of cooked quiche works its way to the middle until the whole pie top has the same appearance. That’s the sign it is done. You don’t want it to overbake or it will be rubbery, but you don’t want it to underbake or you will have soup. For me, watching the top cook inward remains the most reliable way to determine when the quiche is done.

RECIPE

Quick Quiche

Ingredients

  • 1 9-inch prepared pie crust, thawed if frozen
  • paste made of equal parts of flour and water
  • 3 tablespoons butter
  • ½ medium red onion, diced
  • 5 medium mushrooms, coarsely chopped
  • 2 jumbo eggs
  • 1½ cups heavy cream
  • salt and pepper
  • ¼ teaspoon ground nutmeg
  • 4 ounces diced ham
  • ½ cup grated Swiss cheese
  • 1 tablespoon chilled butter cut into 16 small pieces

Method

  1. Follow directions on the package for preparing the pie crust. On a flat surface, roll it out with a rolling-pin so that it will fit into your baking pan with a little extra over the edges. Transfer the prepared crust to the pan, pressing it firmly against the bottom and the sides. Do not trim the edges until you have chilled the unbaked crust. Prick the bottom in several places with a fork. Chill in the refrigerator for 3o minutes.
  2. When you are ready to blind-bake the crust, remove it from the refrigerator, trim off the edge of the crust with your finger. If you are using a regular pie pan, crimp the edge as you would normally. Line the pie shell with a square of non-stick aluminum foil, non-stick side down, and pressing firmly. Fill the foil lining with beans or pie weights, and bake the pie shell in the middle of an oven preheated to 400°F for 8 minutes. Remove from the oven, and remove the foil and weights. Prick the bottom again with a fork in several places and return to the oven for 2 more minutes or until the crust has very lightly browned. Remove from the oven, and cool completely. Inspect for holes made by the fork. Dab any holes with the flour/water paste and set the crust aside until you are ready to fill it.
  3. In a medium sauté pan over medium heat, melt the butter. Stir in the onions and cook until they are translucent. Add the mushrooms, cover, and cook for a minute or two until the mushrooms give up their liquid. Remove the cover and continue to simmer for a few minutes until the liquid has boiled off and the mushrooms have started to brown. Remove from the heat. Cool completely.
  4. In a medium mixing bowl, beat the eggs until well combined. Add the cream, salt and pepper, and nutmeg. Stir in the cooled onion/mushroom mixture. At this point, you can refrigerate the mixture until you are ready to complete the quiche.
  5. When you are ready to bake the quiche, spread the diced ham on the bottom of the partially baked pie shell. Ladle the egg, cream, onion, and mushroom mixture over the ham. You should have about 2½ cups of the liquid which should just fill the Nordic quiche pan about ¾ full. Do not fill more than that, or the filling may over-run the sides of the crust when it puffs up during baking.
  6. Sprinkle the grated cheese over the top of the filling, dot with the bits of butter, and bake in the upper third of an oven preheated to 375° for about 40 minutes. Toward the end of the baking time, check the top of the quiche to see if it has set to the middle. When the quiche is set, turn off the oven, crack the oven door ajar, and let rest for 10 minutes.
  7. Remove from the oven. If you are using a tart pan, balance the pan on a wide support so that the ring can fall away. With a broad spatula, transfer the quiche to a serving plate. If you have a hard time removing the quiche from the pan bottom, just serve it with the bottom on the plate – not as elegant, but it will work.
  8. Serve while warm. Makes excellent cold leftovers. Should serve 4 to 6 depending on what else you are having.

10 Comments

Filed under Food, Photography, Recipes

CORZETTI WITH SAUSAGE AND CLAMS

Our daughter, Carol, has been visiting us for a few days without her family. For her it has been a relaxing time with no chauffeuring duties to swimming, school meetings, the morning school rush, and cooking. She has been doing some work from her office, but she has also found time to sleep a little late, to shop, and to eat out.

Carol has her own big library of cookbooks, but it is different from my collection, so she has spent time leafing through some of my newer acquisitions. She also enjoys working in the kitchen with Susan and me, and we enjoy that, too.  We agreed to cook together on a recipe that appealed to her. She found a recipe in Flour + Water (Ten Speed Press, Berkeley, 2014), the eponymous cookbook from the San Francisco restaurant owned by Thomas McNaughton, a friend of Sarah and Evan.

The recipe she chose was entitled, “Corzetti with Sausage, Clams, and Fennel”, page 186. It involved making pasta – which sounded like fun. The challenge was to re-create the corzetti. Oretta Zanini de Vita (Encyclopedia of Pasta, translated by Maureen B. Fant, University of California Press, Berkeley, 2009) describes the pasta dating back to the thirteenth century and consisting of a bit of pasta dough with two thumb indentations to resemble an “8”. That shape was apparently for commoners because by the Renaissance the pasta was often pressed with special wooden stamps that included coats of arms and other designs. These days you can buy corzetti stamps on the Internet. They are designed to cut the pasta into circles with an imprint on both sides. The little devices are often made of exotic woods and quite beautiful. Trouble is, you have to make a lot of corzetti to justify the purchase as the stamps run $60 or more.

We made do with what I had: a 1½ inch ring from my nest of pastry cutters and a wooden mold that I use for butter and springerle cookies. Carol and I wound up imprinting only one side of the pasta, but that was effort enough for two cooks. The finished pasta, though, cooked beautifully, and the sauce was delicious. It all turned out to be a perfect meal with a nice Italian red, a tossed salad, and a fresh baguette. Pistachio gelatto finished it off. This recipe should serve four generously.

Note: Fennel “pollen” is a common ingredient on the West Coast as wild fennel grows prolifically along the roadsides from south of Big Sur to north of the Bay Area. The yellow “pollen” (I think it is actually the flowers and seeds) is often foraged by chefs from the Bay Area. Ground toasted fennel seeds will make an adequate substitute.

RECIPES

Pasta

Ingredients

  • 2 cups all-purpose flour
  • 1 teaspoon kosher salt
  • 2 large eggs
  • 3 egg yolks
  • 1½ teaspoons extra virgin olive oil
  • water

Method

  1. Heap the flour in the middle of a large, flat, clean surface. Form a well in the middle. Add the salt
  2. Add the eggs, egg yolks, and olive oil to the well, and with a fork, combine the eggs and oil, being careful not to incorporate any of the flour. When the eggs are combined, gradually pull bits of the flour into the mixture until it is completely incorporated. Sprinkle in a few drops of water if you cannot incorporate all of the flour.
  3. Draw the mixture into a ball. Knead for 10 minutes until the dough is smooth and slightly shiny. Add a few more drops of water if necessary. Wrap with plastic film and let rest at room temperature for at least 30 minutes.
  4. When you are ready to roll out the pasta, cut the dough in fourths, working with one piece at a time and rewrapping the remaining pieces.
  5. Pat the piece of dough into a flattened, elongated piece and run it through the pasta machine rollers at the widest setting. Fold in thirds and run through the rollers once more. Repeat the process one more time. Then run the dough through the rollers, decreasing the setting by steps until you have reached the thickness you desire.  (Different machines will have different settings.) You shouldn’t need to flour the dough, but if it is too sticky, lightly dust it while you roll it out.
  6. Place the rolled dough under a clean kitchen towel while you roll out the remaining pieces of dough.
  7. With a 1½ inch circular pastry cutter, cut the sheets of pasta. Then, using a stamp of the same diameter, press firmly on each dough circle to form an imprint. Separate the imprinted circles from the remaining dough (Save that for some other use.) and let rest until you are ready to boil it.

Sausage and Clam Sauce

Ingredients

  • 3 pounds Little Neck clams
  • 1 tablespoon olive oil + more for sautéing the sausage
  • 1 shallot, thinly sliced
  • 1 garlic clove, thinly sliced
  • 2 cups + ½ cup white wine
  • 8 ounces bulk pork sausage
  • 1 medium red onion, diced
  • ½ teaspoon fennel pollen (if you can’t harvest your own fennel pollen, dry-toast fennel seeds and grind finely in a spice grinder. Substitute ½ teaspoon of the ground fennel
  • 2 garlic cloves, minced
  • 1 cup chicken stock
  • juice of ½ lemon
  • salt and pepper to taste
  • extra virgin olive oil
  • 1 tablespoon chopped Italian parsley
  • 1 tablespoon snipped chives
  • grated Romano cheese (optional)

Method

  1. Scrub the clams and let them stand in cold water in a colander for a few minutes to give up their sand. Drain.
  2. In a large sauté pan, heat the olive oil over a high flame. Stir in the shallot and cook until translucent. Add the sliced garlic, 2 cups of white wine, and the washed clams. Cover and cook until the clams open, about 10 minutes. Remove the clams and continue to boil the liquid until it has reduced by half. Cool the liquid completely.
  3. Remove the clams from their shells and return to the cooled liquid. Refrigerate until ready to use.
  4. Wipe the sauté pan clean and return to high heat. Add a tablespoon or so of the olive oil. Then stir in the sausage and brown on all sides, breaking it up as you cook it. Stir in the red onion. Cook until the onion is translucent, about 2 minutes.
  5. Stir in the fennel and minced garlic. Continue to cook until the garlic is lightly browned (Do not burn!). Add ½ cup of white wine and boil until it has almost completely evaporated.
  6. Add the chicken stock, the clams, and their cooking liquid. Bring to the simmer.

Assembly

  1. Cook the pasta by adding it to a large pot of boiling, well-salted water. Return to the boil and cook for 3 – 5 minutes or until the pasta is al dente. Be careful not to overcook.
  2. Drain the pasta and add to the sausage and clam sauce. Simmer the mixture for 2 to 3 minutes until the sauce thickens a bit. Adjust the seasoning with lemon juice, salt, and pepper. Drizzle with extra virgin olive oil.
  3. Divide the pasta and sauce between four plates, top with parsley and chives, and serve immediately. Top with optional grated Romano cheese.

7 Comments

Filed under Food, Photography, Recipes, Restaurants

SANTA FE STYLE COQUILLES ST. JACQUES

The pressure started on Thanksgiving and will extend into January. The pressure, of course, is to keep the weight off in the face of food, food, food. Because of that, we have been trying to eat wisely, including a lot of seafood. I found some frozen scallops at the local Sprouts, and thought they would be tasty even though I wasn’t sure how I would prepare them.  Scallops are delicious grilled over an open flame, but I have already abandoned the outdoor grill for the winter. Besides, that approach is reserved for big diver scallops, and the frozen ones were smaller – about 36 to the pound.

My other favorite ways to do scallops are the two recipes for coquilles St. Jacques in the first volume of Mastering the Art of French Cooking. One of the recipes is in the Parisian style with a thick cream sauce. The other is in the Provençale style with herbs. I decided to meld the recipes and add some touches that would be reminiscent of Santa Fe. That would mean ground chiles, cilantro,  and perhaps a few pine nuts.

Along with the scallops, I decided to use up some leftover grits from the refrigerator. (Grits are definitely not Santa Fe.) To give them some added flavor, I added egg and chopped parsley.

RECIPES

Santa Fe Style Coquilles St. Jacques

Ingredients

  • ½ pound (about 18-20 medium) scallops
  • 2 tablespoons unsalted butter + more for topping
  • 5 medium cremini mushrooms, sliced
  • 2 scallions, minced
  • 1 cup white wine
  • water to cover
  • 2 tablespoons flour
  • ½ cup milk
  • 2 egg yolks
  • ½ cup cream
  • 1-2 teaspoons ground Chimayó red chile (to taste)
  • ¼ cup pine nuts (optional)
  • ¼ cup chopped cilantro
  • salt and pepper
  • ¼ cup asadero cheese, grated (Use Swiss cheese if you can’t find asadero)

Method

  1. Heat the butter over medium-high heat in a small sauté pan. When it has stopped foaming, add the scallops and brown them lightly. Remove from the heat, reserving the browned butter.
  2. In the same pan with the reserved browned butter, combine the browned scallops, mushrooms, scallions, and wine. Add enough water to just cover the mixture. Bring to the boil and then simmer for 5 minutes. Remove the scallops and mushrooms. Return the liquid to the boil and reduce to about one-half. Remove from the heat and stir in the flour and milk.
  3. In a bowl, beat the eggs lightly and stir in the cream. Beat in the still-hot wine and milk mixture. Return to the heat set at low, stirring constantly until the mixture has just thickened. Do not let it get too hot or the eggs will scramble. Remove from the heat, and stir in the chile, cilantro,  and optional pine nuts.
  4. Mix the sauce with the scallops and mushrooms. Transfer to 2 well-buttered ramekins. Top with grated cheese, dot with butter, and heat under a pre-warmed broiler until the top is browned and bubbling. Serve immediately.

Fried Grits Cakes

Ingredients

  • 1½  cups leftover cooked grits
  • 1 large egg
  • ½ cup chopped parsley
  • salt and pepper

Method

  1. Combine the grits, egg, and parsley until well mixed.
  2. Adjust the seasoning with salt and pepper.
  3. Divide into two cakes and fry in about ¼ inch of peanut oil over a medium flame until the cakes are browned on both sides. Serve while still warm.


7 Comments

Filed under Food, Photography, Recipes