Monthly Archives: June 2017

LAMB AND CHICK PEA TAGINE

Our Sunday family dinner triggered by Sarah’s barley tabbouleh turned into a festive Mediterranean-influenced evening. Carol brought an elegant tray of vegetables and a delicious spread of butternut squash and tahini. She had used a recipe from the beautiful cookbook, Jerusalem: A Cookbook by Yotam Ottolenghi and Sami Tamimi (Ten Speed Press, Berkeley, 2012).

I had thought about making pita bread, but instead I found some at the market. Home made will have to wait.  The main attraction was a lamb and chick pea tagine. The purists will insist that it is not a real tagine: I browned the lamb; I used chicken stock; I used big chunks of onion so they could be picked out by the onion deniers; I braised it in the oven for hours; and I used a heavy pot instead of a classic tagine. In spite of all of that, the lamb was fork tender with Moroccan smells and tastes; served with couscous it was a big hit with everyone.

Don’t be intimidated by the long list of ingredients. Many of them are herbs and spices that you probably already have in your pantry. You can easily find the others at the grocery store. Or you can just leave out one or two. Probably nobody but one of the purists will notice.

RECIPE

Lamb and Chick Pea Tagine

Ingredients

  • 1 cup dry chick peas
  • 3 pounds lamb shoulder steaks, bone and heavy fat removed and cut in 1 inch cubes
  • 4 tablespoons olive oil, divided
  • 2 teaspoons paprika
  • ¼ teaspoon ground turmeric
  • ½ teaspoon ground cumin
  • ¼ teaspoon cayenne pepper
  • 1 teaspoon ground cinnamon
  • ¼ teaspoon ground cloves
  • ½ teaspoon ground cardamom
  • ½ teaspoon ground ginger
  • ¾ teaspoon garlic powder
  • ¾ teaspoon ground coriander
  • 1 teaspoon kosher salt
  • 4 cups chicken broth
  • 3 cloves garlic, minced
  • 1 tablespoon freshly grated ginger root
  • zest and juice of ½ lemon
  • 1 tablespoon tomato paste
  • 1 tablespoon honey
  • 1 large white onion, peeled and root trimmed but intact, cut into 8 wedges
  • 4 medium carrots, peeled and cut into obliques
  •  ½ cup dried apricots cut into 1 inch squares
  • salt and pepper to taste
  • 1 tablespoon corn starch stirred into 1 tablespoon water to make a slurry

Method

  1. In a saucepan, cover the chick peas with at least 2 inches of extra water and let stand overnight. Drain and set aside.
  2. In a large bowl, combine the lamb, 2 tablespoons of olive oil, paprika, turmeric, cumin, cayenne, cinnamon, cloves, cardamom, ginger, garlic powder, coriander, and salt. Mix until the lamb is completely coated. Cover tightly with plastic wrap, and refrigerate over night, stirring occasionally.
  3. In the morning, place the chick peas and marinated lamb in a heavy oven-proof pot. Add the chicken broth and bring to the boil over a medium-high flame. Stir in the garlic, ginger root, lemon juice and zest, tomato paste, and honey. Cover and transfer to the middle of an oven preheated to 200°F. Braise for at least 6 hours, stirring occasionally.
  4. About 3 hours before you plan to serve the tagine, add the onion, carrots, and dried apricots.
  5. When you are ready to serve, correct seasoning with salt and pepper. Transfer the meat and vegetables to a large serving platter. Place the cooking pot with the cooking liquid over a high flame and bring to a boil. Add the cornstarch slurry and stir until thickened. Serve in a gravy boat alongside the tagine.


2 Comments

Filed under Food, Photography, Recipes

BARLEY TABBOULEH

The first time I ever ate tabbouleh was nearly 50 years ago at a backyard potluck for our laboratory work group. The offerings included several varieties of potato salad, lots of baked beans, and delicious barbecued chicken. But the standout – and by far the most exotic – was some refreshing tabbouleh brought by our secretary who came from a large Lebanese family. I could have eaten the whole bowl, and I am sure that I made a pig of myself. Since then, our family has made tabbouleh many times, and often for potluck dinners. We keep a bag of bulgur in the refrigerator so that we can make tabbouleh whenever the craving hits. I have never thought of using anything but bulgur – until I tasted some tabbouleh from Sarah’s refrigerator during our recent visit. She had substituted barley, and it was delicious. I gave it a try for our latest Sunday family dinner. It wound up becoming the inspiration for a Mediterranean-themed evening. The downside of tabbouleh is that it involves a lot of chopping and dicing. The upside is that once the chopping and dicing are done, it only takes a few minutes to assemble. I like tabbouleh with a distinctly lemon taste, so I used the juice of 2 lemons. If that’s too much for you, cut back to one lemon.

RECIPE

Barley Tabbouleh

Ingredients

  • ½ cup pearled barley
  • 2 cups salted water
  • olive oil
  • 2 large bunches parsley
  • 1 bunch mint
  • 3 large Roma tomatoes
  • 2 small Persian cucumbers
  • 3 cloves garlic, minced
  • juice of 2 lemons
  • ¾ cup extra virgin olive oil
  • salt and pepper to taste

Method

  1. Stir the barley into boiling salted water and cook at a low boil for 45 minutes or until soft with a little crunch. Drain, rinse, and toss with olive oil to prevent the grains from sticking together. Set aside.
  2. Wash and shake dry the parsley. Trim the leaves of stems. You should have about 6 cups of unpacked parsley leaves. Chop finely or pulse several times with a Vita-Mix set on “3”. Set aside.
  3. Wash the mint and remove the leaves. You should have about 1 cup of unpacked mint leaves. Chop finely or pulse several times with a Vita-Mix set on “3”. Set aside.
  4. Blanch, peel, and seed the tomatoes. Cut into ¼ inch dice. Set aside.
  5. Dice the cucumbers into ¼ inch pieces. Set aside.
  6. In a large bowl, combine the cooked barley, chopped parsley, chopped mint, tomatoes, cucumbers and minced garlic. Stir in the lemon juice and olive oil. Adjust seasoning with salt and pepper. Chill in the refrigerator for one hour. Serve.

Leave a comment

Filed under Food, Photography, Recipes

CHERRIES JUBILEE

A while back, I wrote about sweet cherry season and a request for cherries jubilee. I wound up making a cherry galette instead, with the promise that if there were cherries still around I would make cherries jubilee for the next Sunday family dinner. Cherries are still around at the market, so here’s cherries jubilee, flames and all. It is said that the dish was invented by the famous chef, Escoffier, for a dinner celebrating the Diamond Jubilee of Queen Victoria. That was in the era when flames at tableside were considered very fancy. Inventions of the time included Crepes Suzette and Baked (or Bombe) Alaska.

The next rush of flambéing was in the middle of the twentieth century with its epicenter in New York City and the restaurants favored by “cafe society”.  Steak Diane made its appearance then, as did Bananas Foster (invented in New Orleans), After that, fashion moved on and the popularity of tableside service, especially with leaping flames, virtually disappeared.  I am not certain, but I think there may be a resurgence of interest; at least in our family there has been a recurring request.

There are many recipes for cherries jubilee on the internet, and there are lots of variations: most call for fresh cherries, but you can make cherries jubilee with canned cherries, ready-made cherry pie filling or even cherry Jello. The best version that I could find, and the one that seemed most likely to be true to the original was that recorded by Ethan Becker in his revision of The Joy of Cooking. I used that recipe as a template with my own revisions. The result turned out to be a celebratory conclusion to our last family dinner.  The good news is that no one was burned, and the smoke alarms did not go off. As an aside, to be fool-proof, you should heat the brandy before you try to light it, but be gentle with the heating to avoid burning yourself.

RECIPE

Cherries Jubilee

Ingredients

  • 4 cups ripe sweet cherries
  • ¼ cup Kirsch
  • ¾ cup turbinado sugar
  • juice of 1 lemon, strained
  • ¼ cup brandy

Method

  1. Wash and pit the cherries. In a large bowl, combine them with the Kirsch, cover and refrigerate for 6 hours,  gently stirring occasionally.
  2. When you are ready to serve, transfer the Kirsch-soaked cherries to a chafing dish or large flat-bottomed pan along with the sugar and lemon juice. Over medium-low heat, heat the mixture until the cherries release their juices and the sugar is dissolved. Continue to simmer until the sauce is slightly thickened.
  3. In the meantime, heat the brandy in a small saucepan over low heat. Do not boil. Light the heated brandy by tilting the pan slightly over the flame or with a long match or fireplace lighter. Pour the flaming brandy over the cherries and allow the flames to extinguish themselves. After the flames have died down, stir the mixture gently.
  4. Serve immediately over individual bowls of vanilla ice cream. Serves 6.

2 Comments

Filed under Food, Photography, Recipes

RT ROTISSERIE-STYLE CHICKEN SOUP WITH FARRO

RT Rotisserie has been chugging along since its opening, refining the menu, adjusting staffing patterns, getting the delivery system worked out, and tinkering with other details related to opening a new restaurant. One issue that they have faced from the beginning is what to do with roasted chicken left at the end of the day. Planning supplies is one of the most difficult challenges that a restaurant, especially a new one, faces. Of course, you don’t want to run out while a customer is waiting for his or her order, and you don’t want to have so much leftover that it gets tossed out. If rotisserie chicken is your thing, the solution is to turn roasted chicken into chicken soup. Whole roasted chicken makes a delicious takeout, and roasted chicken on a Dutch crunch roll with a choice of sauces is what many customers are after. Unfortunately, chicken soup gets second billing. That’s too bad, because as far as I’m concerned, RT Rotisserie chicken soup should get star treatment. It is unlike any other chicken soup that I have ever eaten. It has a robust, earthy flavor, and it is filled with chicken and what I judge to be farro. As well, the broth is brimming with unusual vegetables and a blend of herbal flavors. It should be obvious that RT Rotisserie is not going to reveal their recipe, so I have tried to reconstruct the soup. Let me hasten to note that this is not the original version – and it is nowhere as good as the original. Still, it is a pretty good chicken soup in its own right. Since I don’t have a brass and enamel French Rotisol rotisserie in my kitchen, I had to do some substituting. I fried the chicken with barbecue dry rub and then finished it off in chicken stock. That gave the stock a roasted flavor that mimicked the real thing. You could use more or less farro, or you could substitute wheat berries or barley. There are lots of other substitutions that you can make the soup your own. As for me, I will have to be satisfied with my version until my next trip to San Francisco.

RECIPE

RT Rotisserie-Style Chicken Soup with Farro

Ingredients

  • 4 chicken thighs
  • buttermilk
  • 2 tablespoons salt
  • dry poultry rub
  • 3 tablespoons canola oil
  • 2 quarts (8 cups) chicken stock
  • 1 cup dried farro
  • 3 baby bok choy
  • 1 cup chopped mint leaves
  • 1 cup chopped basil leaves
  • 1 cup chopped cilantro leaves
  • 1 cup chopped parsley leaves
  • 5 scallions, chopped
  • 1 tablespoon white sesame seeds
  • 1 tablespoon black sesame seeds
  • salt and pepper to taste

Method

  1. Place the chicken thighs in a sealable container, cover with buttermilk, and add salt. Cover and refrigerate overnight, turning occasionally. Remove the chicken thighs from the buttermilk mixture, pat dry, and coat generously with dry poultry rub. Place in the refrigerator, uncovered, overnight. Fry the chicken thighs over medium heat in a heavy pan with canola, turning occasionally until browned on both sides. In the mean time, bring the chicken stock to the boil in a heavy soup pot. Transfer the chicken thighs to the boiling liquid and cool at the simmer for 15 minutes or until the thighs are cooked through. Remove the cooked chicken to a plate to cool. Remove skin and bones from the thighs, cut the meat into bite-sized pieces and set aside.
  2. Return the chicken stock to the boil. Stir in the farro and cook at the simmer for 20 minutes or until the grain is soft.
  3. Cut the bok choy in half crosswise then in fourths lengthwise. Add to the broth and return to the boil. Stir in the mint, basil. cilantro, parsley, scallions, and white and black sesame seeds. Return to the boil and simmer for 10 to 15 minutes until the bok choy is tender. Adjust seasonings with salt and pepper. Serve while still hot.

Cook’s Notes

  • Undoubtedly you could skip the buttermilk brining, the dry rub, and the overnight drying, but I think that contributes to the rich flavor of the soup.
  • Our family uses a dry poultry rub for barbecuing chicken. We have had the recipe for years, but there are many dry rubs commercially available, and probably your family has its own favorite.
  • Farro is a grain that has been enjoyed in Italy for centuries. It has become increasingly popular in the United States, especially in restaurants. Farro usually refers to emmer wheat, a relative of our usual wheat, but it may also refer to other grains. You should be able to find it in a large, well-stocked grocery store, but if you can’t you can easily substitute wheat berries or pearled barley. For that matter, you could substitute rice or pasta. The amount is up to you.
  • One way to tell when the soup is cooked is to look at the white sesame. It will tend to float on the surface until it is cooked. That’s a good sign that the soup is ready.


1 Comment

Filed under Food, Photography, Recipes, Restaurants

SHRIMP-STUFFED ROASTED ARTICHOKE

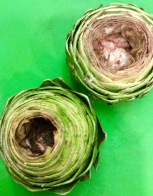
Before we left for our child-tending excursion in San Francisco, I bought two beautiful artichokes at the grocery store. They were on special for Mothers Day. We wound up eating out a lot during the week, and so the artichokes languished in the refrigerator. When we returned home, I was worried that the artichokes might have spoiled. They had not, so I was confronted with what to do with them. Usually I boil them and serve them with Hollandaise, but I wanted to do something a little different. I remembered a wonderful dinner that we enjoyed many years ago in Ruston, Louisiana. Our host had gone to enormous trouble to wedge a bit of spicy shrimp into every space between the leaves. Such a dish is a traditional Louisiana favorite, but it is usually reserved for special dinners because it takes so much effort. I thought that maybe I could make something that approximated that long-ago creation with not so much work. It turns out that this version is really easy if you have a food processor. Probably a Vita-Mix would work, too.

RECIPE

Shrimp-Stuffed Roasted Artichoke

Ingredients

  • 2 large artichokes
  • 2 slices good quality French bread
  • leaves from 6 stems of parsley
  • 3 cloves garlic, peeled and chopped coarsely
  • 2 tablespoons fresh lemon juice
  • 2 tablespoons olive oil + more to drizzle on the tops of the stuffed artichokes
  • ¼ teaspoon Old Bay seasoning
  • salt and pepper to taste
  • Tabasco sauce to taste (optional)
  • 1 cup ready-cooked salad shrimp, thawed
  • ½ cup grated Parmesan cheese

Method

  1. Prepare the artichokes by trimming the stem and the tips of the leaves. Cut off the top of the artichoke and remove the inner leaves to reveal the choke. Using a spoon, scrape out the fuzzy bits of the choke.
  2. Cut the bread into cubes and place in a food processor. Process until the bread forms coarse crumbs. Add the parsley leaves, chopped garlic, lemon juice, and olive oil and process until well combined but not puréed. Add the Old Bay, salt and pepper, optional Tabasco sauce, shrimp and grated Parmesan and process for just a few seconds until the shrimp are finely chopped but not puréed.
  3. Fill the center of each artichoke with the shrimp mixture and then spread the remainder over the tops of the artichokes. pressing down to force some of the mixture between the leaves.
  4. Place the stuffed artichokes in an oven-proof pan filled with about 1½ inches of water. Drizzle the tops with olive oil. Cover the pan with heavy aluminum foil, and poke four holes in the foil. Place in the middle of an oven preheated to 375°F. Roast for 1 hour covered, then remove the foil and roast, uncovered, for another 15 minutes. NOTE: Be very careful when you remove the foil, as steam may rush out and burn your fingers.
  5. Transfer the roasted artichokes to plates and serve with Hollandaise. I used Julia Child’s never-fail quick blender sauce.

5 Comments

Filed under Food, Photography, Recipes

THE BIG DAY HAS ARRIVED – RT ROTISSERIE OPENS

After months of planning, construction delays, major renovations, and recipe testing, RT Rotisserie opened during the Memorial Day weekend. The first day was a big success: A good-sized group was lined up before the doors opened, and the line at the order counter continued unabated through the lunch hour. There were the to-be-expected opening day hiccups. Staffing could have been different. Some of the dishes needed adjustments. Menu changes were already under discussion. And, of course, there was the inevitable and predictable plumbing emergency. In spite of all of that, the opening went smoothly, and Sarah and Evan returned home well after midnight, satisfied with the day.

We had travelled from Los Angeles to take care of the boys during opening week. That’s a challenge for a couple of old folks, but we managed to keep the little ones entertained. They only asked, “Where’s Mommy?”, a few times. Still, we did get a chance to try out the food at the restaurant. Our son and his family came up from Silicon Valley. They had originally planned to go on a canoeing and camping trip in the Sierras, but the road to their favorite lake had been damaged during the winter’s heavy storms. Instead, they joined us in a trip to RT Rotisserie after the lunchtime rush. Still, I think there was a little shock when eight of us appeared in line in a smallish space that seats 49. Later we learned that other large family groups had come in earlier in the day.

We enjoyed several things from the menu. First was the centerpiece of the offerings, rotisserie chicken. Preparation includes an overnight brining in house-made buttermilk fortified with brine and several herbs and spices. Then the brined chicken is air-dried in a large refrigerated walk-in for a day so that the skin will roast to a tasty crispness. Huge slabs of pork belly undergo similar treatments before they are filled with a tasty stuffing and then placed on the spit. Most surprisingly whole heads of cauliflower are given a similar preparation before they are roasted. When they came to the table in their own special sauce, they were unlike any cauliflower I have ever had. They could be a meal in themselves.

A parade of sauces, including chimichurri, Douglas fir sauce, brought the main items to new levels.

Sides were delicious: umami-dusted sweet potato fries, grilled potatoes, and a chicken soup with a rich broth filled with chunks of chicken, chopped vegetables, barley, and fragrant herbs. Dishes of strawberry- and milk-flavored soft serve ice cream in swirls kept the kids entertained while we waited for our food. Unfortunately we did not get to sample Sarah’s dessert, chocolate sablé ice cream sandwiches.

After all that food, we went home and tried to squeeze in a nap. With what must have been a sugar rush, the boys would have none of that. But they and we had had a good day, and RT Rotisserie seemed to be off to a good start.

8 Comments

Filed under Food, Photography, Restaurants