Monthly Archives: August 2014

GAZPACHO CRUDO

A couple of weeks ago, Sarah and Evan cooked at the James Beard House operated by the James Beard Foundation in New York City.  We had the pleasure of watching them via a webcam in the kitchen.

Their dinner menu included a number of the dishes that have become favorites at Rich Table in San Francisco, including gazpacho with strawberries, chicken skin, and burrata. I have enjoyed that dish several times, but I am not a skilled enough cook to duplicate it, so I’ll just need to make do with gazpacho.

For me, the taste of traditional gazpacho is wonderful. But I don’t like the mouth-feel. It reminds me of baby food. I much prefer seeing the vegetables and bread intact so that it’s almost like eating a liquid salad in a bowl or cup.

I found just the right ingredients at the farmers market, including an Armenian cucumber, aka snake melon. It is not really a cucumber, but it has the crispness and crunch of the freshest of regular cucumbers and without having to worry about seeds. It also has the charm of being slender, long, and coiling around itself. It’s easy to see why it has the name of snake melon.

Vegetables for gazpacho

Vegetables for gazpacho

Easy to make, and refreshing in the fading days of summer.

Croutons on top, ready to serve

Croutons on top, ready to serve

RECIPE

Gazpacho Crudo

Ingredients

  • juice of 1 lemon
  • ½ cup extra virgin olive oil
  • 2 ripe large heirloom tomatoes, blanched, peeled, seeded and coarsely chopped
  • 1 large green bell pepper, seeded, membrane removed, and coarsely chopped
  • 1 medium red onion, diced
  • 1 small Armenian cucumber, diced
  • 2 garlic cloves, peeled and mashed into paste
  • ½ cup Italian parsley, finely chopped
  • 4 cups chicken stock
  • salt and pepper
  • 1 large, I inch-thick slice of good-quality bakery bread, crust remove and cut into 1 inch cubes
  • 3 tablespoons olive oil
  • 2 garlic cloves, peeled and sliced thinly

Method

  1. In a large bowl, whisk together the lemon juice and olive oil.
  2. Stir in the tomatoes, bell pepper, onion, cucumber, garlic paste, and parsley, making sure to coat the vegetables with the lemon/olive oil mixture.
  3. Stir in chicken stock. Adjust seasoning with salt and pepper. Chill in the refrigerator for 2 hours.
  4. In the meantime, let the bread cubes dry at room temperature for 1 hour.
  5. In a small skillet, heat the remaining olive oil over medium heat. Add the sliced garlic and sauté for a few minutes until the garlic is lightly browned. Remove the garlic slices, and add the bread cubes, stirring frequently until lightly browned and crisp. Drain the croutons on several layers of paper towel. Cool, and set aside until ready to garnish the gazpacho.
  6. Serve the gazpacho in bowls or in large cups with a spoon. Garnish with croutons.
  7. Serves 4.

4 Comments

Filed under Food, Photography, Recipes

GREEN CHILE CHEESEBURGER – MY TAKE

The journey begins at home, they say, so after writing about my search for the perfect green chile cheeseburger, it only seemed fair that I write about my version. It is based on my observations over the years. It is what I like, so I make no claims for its being in the “best” category, and I certainly would not think of entering it in any contest. I will leave that to the pros.

The first essential is roasted green chiles. You can buy them canned or frozen, but in New Mexico this is green chile season, so there are roasters at the farmers market, and farmers from Hatch and Chimayo (Hatch’s chief competitor) bring gunny sacks filled with green chiles along with roasting cages and butane burners to parking lots all over the city. They will roast as many as you want, and then it is up to you to peel them, cook with them, and put them up for the winter ahead.

Alternatively, you can roast the few that you need for a recipe at home. There are lots of ways to do that: you can roast them under the broiler in your oven; you can use your outdoor grill. The problem with that is that the wonderful roasting smell will draw neighbors and even strangers to your back yard; you can roast chiles over a gas flame; but my favorite way is to use a chile roasting grill that I purchased years ago at the Santa Fe School of Cooking. I like it so much that I have given many of them to friends on my gift list.

The second essential is to have a tasty melting cheese. Asadero is my favorite, but mozzarella, Monterey jack, cheddar, Emmental, or even Gruyère will also work. The important thing is to make sure that whatever cheese you use, the finished product is as gooey as you can make it.

The third essential is the bun, You should use the very best quality bun you can find. Kaiser rolls are good. Hamburger buns in the cello wraps are not good, but if that is all you can find, it will have to do.

Finally, of course, the most essential ingredient is the meat. I use ground beef with 93% lean, but whatever your favorite might be – from 85% to ground sirloin –  will work. You should plan on anywhere from 4 to 8 ounces of meat per burger. I do a couple of things that are considered heretical. First, I incorporate seasoning – salt, pepper, red pepper if you wish – into the meat. With burgers that big, I don’t think salt or pepper can find their way into the middle and the finished burger tastes bland. Second, that means you will have to mix the meat lightly before you shape the burgers. Just try hard not to compress the meat too much. Third, frying the burger in a cast-iron pan or on a flat grill yields a texture that is tastier to me than from a grill

One tool that helps a lot, especially if you make half-pound burgers, is an instant-read probe thermometer. It will take 7-10 minutes or longer on each side to get the right doneness, and the old thumb-pressure trick may not work as well as you are used to with steaks and smaller burgers. Here are some temperature suggestions: Rare – 130°F (54 °C); Medium-Rare – 135°F (57 °C); Medium – 145°F (63°C); Well Done – 150°f ( 66°C).  IMPORTANT: If you are worried about possible risks with undercooked ground beef, cook longer and adjust your temperature accordingly.

Sauce and extras like thick slices of onion and tomatoes, pickles, and lettuce are your option.

Ingredients

  • 2 – 4 fresh Hatch green chiles
  • 2 teaspoons mayonnaise
  • 2 teaspoons Dijon mustard
  • 2 teaspoons ketchup
  • 2 -4 good-quality hamburger buns
  • butter
  • 1 pound 93% fresh ground beef
  • 1 teaspoon salt
  • ½ teaspoon ground black pepper
  • ¼teaspoon cayenne pepper (optional)
  • 2 – 4 slices asadero cheese

Method

  1. Heat the roasting grill until the screen turns bright red. Place the fresh chiles on the grill, turning them frequently until all sides are evenly charred. Remove from the heat and place in a zippered plastic bag. Allow them to cool. Then, under running water, peel away the charred skin. If you have roasted the chiles evenly, the skin should pull away easily. Remove the stems, slit one side, and remove seeds and ribs. Set aside.
  2. In a small bowl, mix the mayonnaise, mustard, and ketchup together.
  3. Butter both halves of the hamburger buns and toast on a dry, hot skillet.  Spread both tops and bottoms with the mayonnaise, mustard, ketchup mixture. Set aside.
  4. Combine the meat with salt, pepper and optional cayenne. Gently divide into 2 or 4 equal portions. Press into patties about the same size as the buns.
  5. Heat a cast-iron skilled over high heat. When it smokes slightly, add the hamburger patties. Sauté on one side for 7 to 10 minutes. Turn and sauté the other side. Check the temperature with your instant-read probe thermometer.
  6. About 2 minutes before you are ready to finish the hamburgers, top each with 1-2 roasted green chiles, a generous slice of asadero cheese, and the top half of a hamburger bun. Check the temperature again.
  7. Transfer the burgers and toppings to the bottoms of the buns and serve immediately.
  8. Have available sliced onions, tomatoes, pickles,  other condiments, and sides of your choice – potato chips, French fires, potato salad, etc., etc.

4 Comments

Filed under Food, Photography, Recipes

ON THE TRAIL OF THE GREEN CHILE CHEESEBURGER

The best green chile cheeseburger I have ever eaten was at Ski Apache near Ruidoso, New Mexico. I realize that there is a situational bias to that statement. Every day during ski season, weather permitting, cooks fired up an outdoor grill close to the lift line. The scents of fresh roasted green chiles and hamburger would drift up the lift line creating hunger pangs that made it hard to unload at the top. Then you had to deal with the wonderful fragrance as you made it down the trail as quickly as possible to get in line for your own burger.

Since then, I have been looking for the perfect green chile cheeseburger. I am not alone in that quest, nor am I the first. In fact, the State of New Mexico has its official Green Chile Cheeseburger Trail. New Mexico has an official state cookie – the biscochito – and two official state vegetables – the chile and the pinto bean – but it does not have an official state dish, probably because there are a lot of candidates – enchiladas, Frito pie, fry bread among them. Nor does the state have an official sandwich even though nearly every New Mexican would probably agree that the designation should go to the green chile cheeseburger.

Nobody knows exactly who invented the GCCB. Some say it was the original Blake’s Lotaburger store in Albuquerque. (Blake’s is our local junior McDonald’s or In-N-Out with stores all over the state.) Of course that claim is disputed, and there are several claimants to the honor. Whatever the origins, the GCCB can be found in virtually every city and hamlet across the state, most of them claiming that they have the world’s best GCCB.

The first GCCB to gain national recognition came from the Owl Café in San Antonio, NM, a tiny little town just off Interstate 25. It was made famous by the commentator, Charles Kuralt who discovered it in his journeys around the USA. For years I always stopped at the Owl on my many trips up and down the interstate. Then I discovered Manny’s Buckhorn Tavern, just a short distance  across the road in San Antonio. The rustic outsides, the numerous flashing beer signs and the armada of parked motorcycles suggested that it was not the place to be, but once inside, it felt comfortable and welcoming. Bobby Olguin, Manny’s son and heir was at the flat top behind a partition, frying up Buckhorn Burgers. The solitary middle-aged waitress was scurrying around taking orders, and the stuffed mountain lion and various birds of prey occupied the walls of the back room.

Bobby always stuck his head around the partition to give a welcome, and if things were slow, he would pay a little social visit at your booth. Then things changed. the Buckhorn was discovered by the Food Network and Bobby Flay, who lost a throw-down to Bobby Olguin. After that, there was a long waiting line at the front door and a sign that said, “Please wait to be seated” near the entrance. Bobby hired some cooks to work the flat top so that he could work the dining room, and sadly, the stuffed mountain lion disappeared because Bobby had watched Robert Irvine’s television series about restaurant re-dos. Bobby thought the place needed a face lift and the mountain lion had become too dusty and mangy. Nothing much else has changed, and the GCCBs are as good as they have ever been.

San Antonio, besides being the epicenter of the world of the GCCB is also the gateway to the Bosque del Apache National Bird and Wildlife Refuge. During the winter, birders from all over the world come to watch the hundreds of thousands of sand hill cranes, Canada geese, and snow geese along with bald eagles and numerous other birds. Of course, many of those tourists visit the Owl and the Buckhorn.

One of our previous governors, unwilling to get caught up in the controversy of who had the best GCCB in New Mexico, but wanting to promote the competition and with the encouragement of food writers, suggested the promotion of the GCCB. The Office of Tourism took up the effort in 2009. They created the Green Chile Cheeseburger Trail, identifying restaurants across the state with noteworthy GCCBs. The list was updated in 2011 with the help of noted Santa Fe cookbook author, Cheryl Alters Jamison, along with other food writers and cooking professionals. Their list included around 200 noteworthy GCCBs. Both the Owl and the Buckhorn recused themselves from any competitions to select the state’s best GCCB. Still, there were lots of potential candidates.

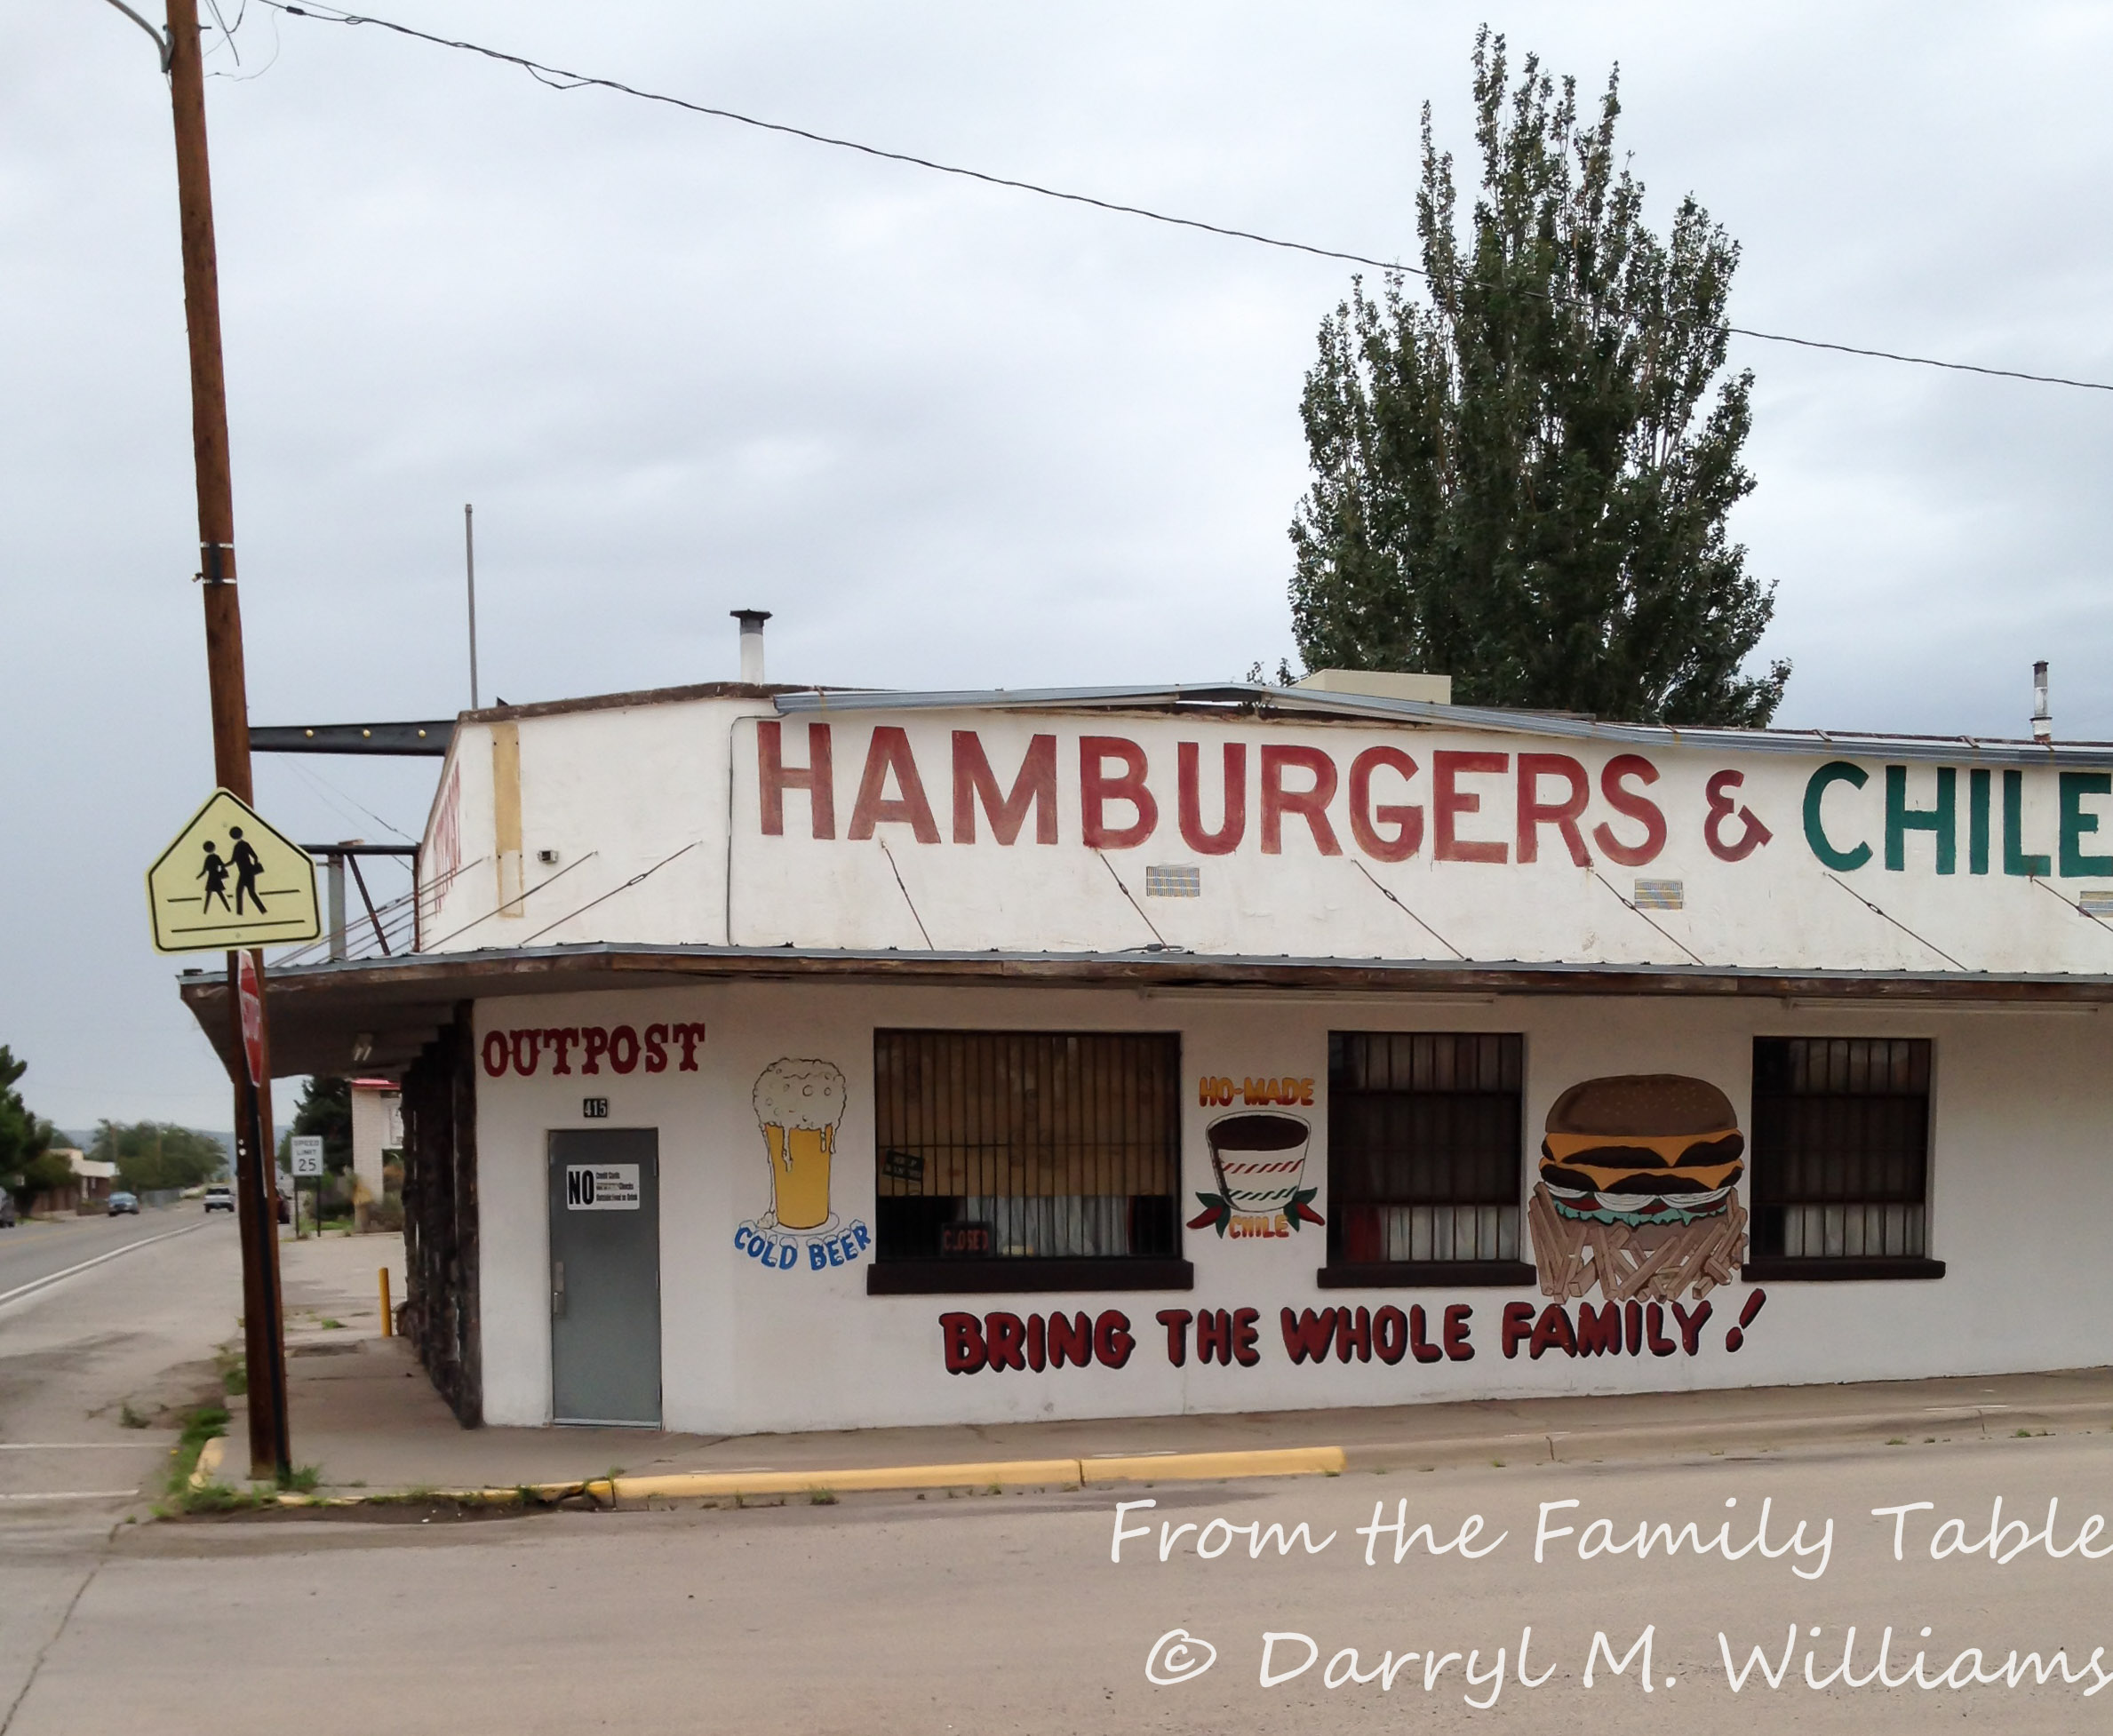
Sparky’s is a perennial favorite. In part that is because the place is in Hatch, home of the world-famous New Mexico green chile.  Bert’s Burger Bowl in Santa Fe is often mentioned as a contender because it has been featured on Guy Fieri’s  “Diners, Drive-Ins and Dives” on the Food Network. Unfortunately, some of the strongest contenders have shuttered their doors. One of my favorites was the Outpost in the town of Carrizozo, just down the road from San Antonio. It was a family biker bar with motorcycles lined up in front, 12-foot rattlesnake skins tacked up on the walls, a terrarium filled with lizards and other desert varmints, and a pool table toward the back of the dining room. They had a wonderful GCCB along with crisp but greasy French fries, but I guess the owner just got tired and decided to close.

The now-closed Outpost in Carrizozo, New Mexico

The now-closed Outpost in Carrizozo, New Mexico

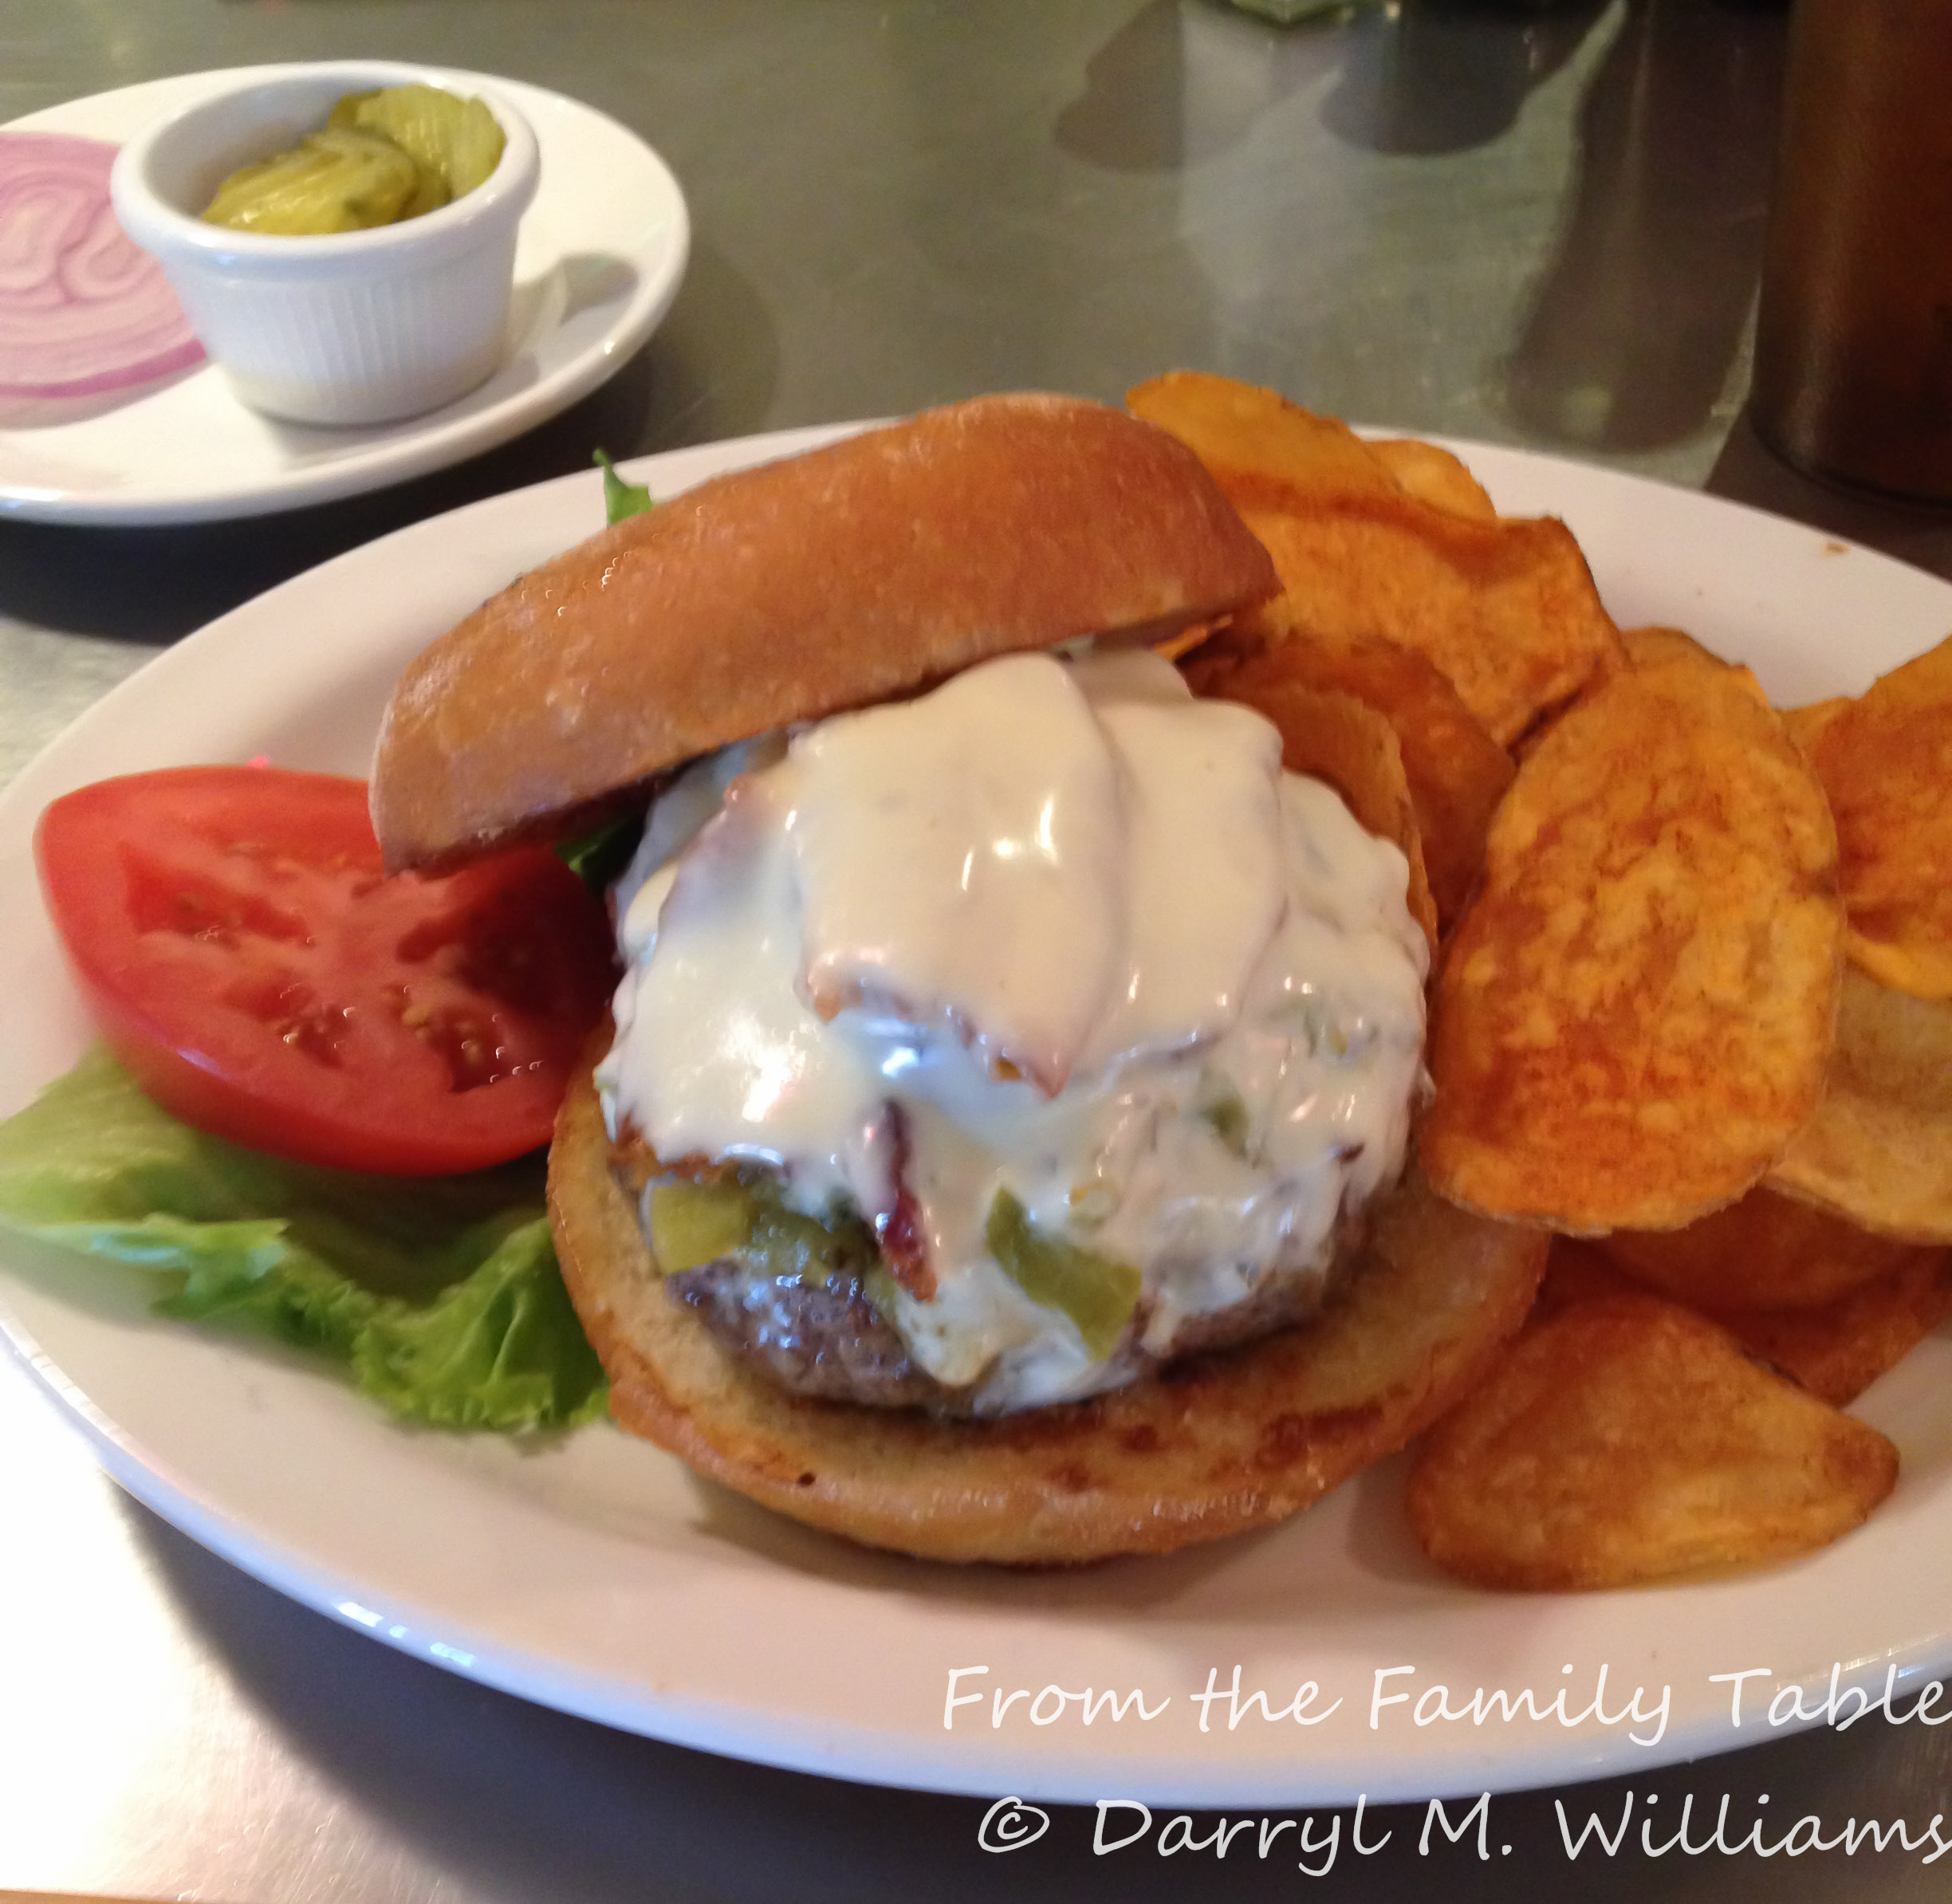
In my view, the Santa Fe Bite stands in a class of its own. It formerly operated as the Bobcat Bite in a tiny little adobe building just off the interstate several miles from Santa Fe. It had quirky hours, and there was always a line waiting for coveted few seats when it was open. After a lease fight with the adobe’s owner, the restaurant relocated to much better, bigger digs in downtown Santa Fe. They are still jammed at lunch time. Their burger is made of 10 ounces of freshly ground sirloin, prepared to your liking. Because it is so big, even for medium rare it takes a while to prepare. Just be patient. You can get it plain, with cheese, with green chile, with bacon, or with all of the above along with fresh house-made potato chips and a side of onion and pickle. Of course, there’s mustard, ketchup, and mayonnaise available, but to me that just covers up the great taste. The Santa Fe Bite GCCB is definitely not for the faint-hearted, and you should be prepared to ask for a doggy bag.

Green chile cheeseburger with bacon and house-made potato chips at the Santa Fe Fite

Green chile cheeseburger with bacon and house-made potato chips at the Santa Fe Fite

If you’re interested in following the GCCB Trail, check out the website. You won’t be disappointed wherever your travel takes you.

4 Comments

Filed under Food, Photography, Restaurants, Travel

ANASAZI BEANS AND RICE

The Anasazi were a native people who lived in the Four Corners area of the United States – New Mexico, Colorado, Utah, and Arizona. What they called themselves is unknown, but archaeologists working in the area called them “the Anasazi” from a Navajo word which means “the ancient ones” or “the ancient enemy”. The modern Pueblo Indians, who live in villages throughout the Rio Grande Basin are thought to be the descendents of the Anasazi who abandoned their native homeland during a prolonged drought in order to be closer to a more reliable water source near the largest river in the region. The Pueblo Indians don’t like the name, Anasazi, for obvious reasons, but it has stuck.

The Anasazi began their civilization at least hundreds if not thousands of years BCE, living in pit houses, but they advanced rapidly to live in sophisticated multi-story stone apartments situated in secure areas like mesa tops and huge hollows in stone cliffs There they could pull up ladders leading to the valley floor and ride out sieges from marauding enemies.  When they finally abandoned their homelands in the 1400s, they had built amazing structures like Cliff Palace in what is now Mesa Verde National Park in Colorado, the White House in present-day Cañon de Chelly National Park in Arizona, and what may be the most sophisticated population center of all, Chaco Canyon in New Mexico, with advanced astronomical observatories, and a web of roads and trails leading in all directions, suggesting that the place may have been the commercial or religious center for the entire region.

Today, there are only a few remaining structural links to the ancient people: Taos Pueblo in northern New Mexico, the ruined Pecos Pueblo that I wrote about a while back, other ruins scattered around the Four Corners, and much more modest communities in the existing pueblos.

All of that is a long-winded introduction to Anasazi beans and how they got their name.  The traditional story is that a sealed jar of beans was discovered by archaeologists digging in the ruins of the Cliff Palace. The beans were spotted red and white, unlike any other beans the scientists had seen. To their surprise the beans sprouted, and were subsequently propagated. This story has its detractors who say that beans lose their ability to sprout after 50 years or so. They think that while the beans may have been discovered in the clay pot they could have not germinated, but  they were identical to beans that had continued to be cultivated in the region. Of course, there have been multiple interpolations of the two stores, so we really don’t know the truth. Nevertheless the name, Anasazi beans, was given to the beans and it has stuck ever since.

For a time, the beans were raised commercially only in Colorado, but now they are raised in many places, probably because of their unusual coloration and because of their distinctive, some say sweet, taste.

We bought a big supply of Anasazi beans at a farm stand, so I decided to make a variation on the Louisiana classic, red beans and rice. I know that late summer is way too hot to be making beans and rice, but I had the beans, so why not.

RECIPE

Anasazi Beans and Rice

Ingredients

  • 2 cups Anasazi beans
  • water
  • 2 tablespoons olive oil
  • 1 large yellow onion, chopped
  • 2 closes garlic, minced
  • 4 cups chicken stock
  • 1 stalk celery, diced
  • 1 green bell pepper, diced
  • 6 ounces ham slices, cut into ½ inch squares
  • 8 ounces link sausage, Andouille, bratwurst, or your choice, cubed
  • 1 tablespoon dried Mexican oregano, crumbled between your hands
  • 1 teaspoon ground cumin
  • salt and pepper
  • 8 cups cooked rice
  • chopped scallions for garnish
  • Louisiana hot sauce (optional)

Method

  1. Pick over the beans carefully for small stones and shriveled beans. In a large pot, cover the beans with water to at least 2 inches depth. Soak overnight.
  2. In a large, heavy-bottomed pot, heat the oil over medium heat. Add the onions and cover to sweat for 5 minutes until they are translucent but not browned.
  3. Stir in the garlic, chicken stock, celery, bell pepper,  ham pieces, cubed sausage, oregano, and cumin. Bring to the boil, and then cover and reduce the heat to the simmer.
  4. Cook the beans until they are tender, 2 to 4 hours.
  5. Uncover and raise the temperature to a slow boil in order to reduce the liquid until it is thickened to your taste. Adjust seasoning with salt and pepper.
  6. Place a cup of cooked rice in each serving bowl. Ladle on the cooked beans. Serve with optional chopped scallions and hot sauce.

3 Comments

Filed under Food, Photography, Recipes, Travel

BOXED MACARONI DINNER INCOGNITO

Some time ago I wrote about James Kraft and his invention of Velveeta processed cheese food. His small company morphed into a giant food manufacturer that has been responsible for some of the inventions that have made American cuisine what it is. Those inventions include Miracle Whip salad dressing, Cheez Whiz, Parkay margarine,  and arguably the most famous of all, the Kraft Macaroni and Cheese Dinner that came into being in 1937.

Since then, there is probably not a single American child who has not had boxed macaroni and cheese. In fact, in our family it is a child’s favorite that is often preferred to Mom’s carefully crafted (no pun intended) macaroni and cheese made from the finest ingredients. The good news is that children’s tastes change as they grow older.

Recognizing the appeal of boxed macaroni and cheese dinners with kids, some time back when we were watching over some of our grandchildren for several days, I bought a box but wound up not using it. It came home with us and has been residing in our pantry for awhile (It is virtually indestructible and will probably last forever, along with my box of Velveeta). It has become a bit of an embarrassment, so when I was reorganizing the pantry a while back, I decided to use it with the sub-plot of disguising it so much that it would fool an adult.

Well, it turned out to be pretty well disguised, but sorry to say, you will not be fooled. Still it was a pleasant diversion and something that went ok with soy-sauce-and-lemon-vinaigrette-braised flounder.


RECIPE

Boxed Macaroni Dinner Incognito

Ingredients

  • 1 7.25-ounce package of Kraft macaroni and cheese dinner
  • 1 10-ounce package of frozen spinach, thawed
  • 1 teaspoon Pernod (optional)
  • 5 button mushrooms, sliced
  • 2 tablespoons olive oil (doesn’t need to be EVOO)
  • salt and pepper
  • ¼ cup panko
  • 1 ounce Parmesan, grated
  • butter to dot the top of the casserole

Method

  1. Prepare the macaroni and cheese dinner according to instructions on the box. Pour the finished dinner into a bowl and set aside.
  2. With your hands, squeeze as much water out of the thawed spinach as you can. Chop finely.
  3. Saute the mushrooms over medium heat in the olive oil. Drain.
  4. Combine the spinach and mushrooms with the prepared dinner. Stir in Pernod to your taste, but be careful as it can be overpowering if used too liberally)
  5. Adjust the seasoning with salt and pepper
  6. Top with panko and grated Parmesan. Dot with butter.
  7. Bake in the middle of a 350° F (177° C) oven for 40 minutes or until the top is browned and bubbling. Serve.


5 Comments

Filed under Food, Photography, Recipes

PAPPARDELLE WITH FAVA BEANS AND PROSCIUTTO

This past week I discovered a new vendor at the farmers market, a young man with a big basket of fava beans. I bought what I thought was a huge bag, forgetting that fava beans are one of those joys of fresh vegetables that is associated with a lot of effort and a very small return except in flavor. I shelled what looked like a quarter bushel of favas,  blanched the beans, took off the rubbery outer layer, and wound up with a cup of bright green beans. It’s no wonder that many cooks consider them either the equivalent of gold or not worth the effort.

Fava beans are one of the few (only?) Old World beans, and they have been grown for centuries in the Mediterranean basin. It seems a quirk of geography and genetics, then, that some individuals of Mediterranean extraction, most commonly, may harbor a deficiency of an enzyme, glucose-6-phosphate-dehydrogenase (G6PD for short) that makes them susceptible to substances found in fava beans. If an individual is sensitive, he – more common than she – may experience a sudden illness with rapid breakdown of red blood cells, and even kidney failure and death unless it is recognized and rapidly treated. The illness is well-known and has been called favism to show the link with fava beans. Fortunately, the vast majority of individuals can eat fava beans without worry.

I had thought that favas and prosciutto would go well with lightly sautéed bucatini pasta, but alas there was none to be found in any of the local stores. At that point I turned to my copy of Encyclopedia of Pasta, written in Italian by Oretta Zanini de Vita and translated by Maureen B. Fant (University of California Press, Berkeley, 2009). If you haven’t seen that little volume, you should check it out. It describes nearly every pasta shape you can imagine, tells how each pasta is made, and suggests how to use each one.

With all of the sensory overload of that beautiful book, I remained undecided until I remembered some wonderful pasta that I had purchased at our village market. I found it in the pantry, four-foot lengths of pappardelle folded in half and dried for “easy storage”. The manufacturer, Maestri Pastai,  makes all kinds of unusual types and sizes of pasta. That’s great if you have a hard time finding exactly what you are looking for and don’t have the time or skill to make it yourself. Check out their website.

The rest of the ingredients for this dish were easy to find. I had a spare package of prosciutto in the refrigerator, and that seemed like the perfect foil for the favas. The scallions came from the market, the mint from the back yard, and there is always a chunk of Parmesan in the refrigerator.

RECIPE

Pappardelle with Fava Beans and Prosciutto

Ingredients

  • 2 pounds fresh fava beans
  • 5 ounces dried pappardelle
  • 3 tablespoons unsalted butter
  • 3 tablespoons olive oil
  • 4 scallions cleaned and cut into ½ inch slices, white and green ends
  • 3 ounces prosciutto, thinly sliced and cut or torn into bite-sized pieces
  • 25 fresh mint leaves cut finely into chiffonade
  • 2 ounces fresh Parmesan, grated
  • salt and pepper

Method

  1. Shell the fava beans by breaking off one end and opening the pod along the seam. Collect the beans in a small bowl
  2. Plunge the shelled beans into two quarts of vigorously boiling salted water. Return to the boil for one minute – no more – and then drain the beans and transfer to a large bowl filled with ice water.
  3. When the beans have cooled, remove the outer skin with your fingers, being careful not to mash the beans. Collect the bright green inner beans in a small bowl and set aside.
  4. In a large pot, bring three quarts of salted water to the boil. Add the dried pappardelle and stir occasionally until the pasta is cooked, al dente, about 12 minutes, longer if you live at high altitude. Drain the pasta but do not rinse.Return to the pot along with the butter and olive oil. over medium heat. Add the scallions. Stir occasionally until the butter is completely melted and slightly colored. The pasta should have absorbed the oil and butter and sautéed lightly, but not browned.
  5. Stir in the fava beans and prosciutto until they are warmed through – 2 or 3 minutes. Stir in the mint leaves.  Adjust the seasoning with salt and pepper. Top with grated Parmesan,  and serve immediately.

5 Comments

Filed under Food, Photography, Recipes

STUFFED SQUASH BLOSSOMS REDUX

It’s the time of year again when squash blossoms make their appearance at the local farmers market. When that happens, I always buy a dozen for stuffing. Of course, if you have your own zucchini patch, you can harvest your own squash blossoms. Choose the male flowers without the swelling at the bottom that will ultimately become the mature squash.

It is surprising how many things you can do with these delicate flowers. There is a lovely soup, sopa de flor de calabazas, and you can use them in quesadillas, pancakes, etc., etc., but I always wind up stuffing them.  Whatever you do with them, use them the day you buy or pick them because they fade very quickly. If the blossoms have stems, you can keep them fresh in ice water in the refrigerator with a plastic bag over them, just as you keep parsley and other herbs. Even then, you should try to use them the same day you buy or pick them.

Exactly three years ago, I posted a recipe for stuffed squash blossoms which I liked a lot (still do), but the batter was a little heavy. The mushrooms I used to stuff them were tasty, but there are so many other options, that I thought you might like this version which has a lighter tempura batter and a stuffing of local ingredients. You can even fry squash blossoms with no stuffing and no batter at all. In truth, whatever you do with the flowers, they almost always turn out delicious.

One step that is often overlooked is the removal of the stamen. You can stuff the blossoms with the stamen still in, but it may make things a little bitter, and besides you want there to be as much room for the stuffing as possible. To perform that little surgical task, you can use a pair of long tweezers. I use a surgical hemostat. Scissors might work, and if your fingers are not too fat, they might work, as well. An important caution with this step is not to tear the sides of the blossom cup or the leaves. If you do that you run the risk of having all the filling run out while frying, even with a patch job. Some images on the internet show part of the flower cut away. If you are just going to stuff the flowers, that will work, but if you plan to fry them, the stuffing needs to be hidden away.

Stuffed squash blossoms sound a bit complicated. They aren’t really, and they are certainly worth the effort.

RECIPE

Fried Squash Blossoms Stuffed with Goat Cheese and Pine Nuts

Ingredients

  • 8 ounces chèvre-style goat cheese softened at room temperature
  • 1 tablespoon fresh lemon juice
  • 2 tablespoons shallot very finely chopped
  • ¼ cup parsley, finely chopped
  • ½ cup pine nuts
  • salt and pepper
  • 12 fresh, large squash blossoms
  • 2 cups all-purpose flour, divided
  • 1 large egg yolk
  • 1½ cups ice water
  • peanut oil for frying

Method

  1. In a small bowl, combine the softened goat cheese and lemon juice to form a smooth paste. Stir in the shallot and parsley.
  2. In a small dry skillet over medium heat, roast the pine nuts for a few minutes, stirring them frequently, so that they brown slightly and release their oils. Be very careful not to burn. Remove from the heat. Cool. Chop coarsely if you like, and stir them into the cheese mixture. Adjust the seasoning with salt and pepper. Set aside.
  3. Prepare the blossoms by removing the stamens, being careful not to tear the petals of the flowers. If the flowers are dusty, you may rinse them, although they do best with as little handling as possible.
  4. With a spoon, pastry sleeve, or your fingers, fill each blossom with stuffing. I have found the greatest success using my fingers. Fill only to the base of the petals so that you can fold them over one another and seal them with a dab of the cheese mixture. Arrange on a plate and chill for the few minutes needed to prepare the batter and heat the cooking oil.
  5. Place one cup of flour in a pie plate.
  6. In a small bowl that is big enough to dip the blossoms individually, beat the egg yolk and ice water together and then stir in the remaining cup of flour. The batter should be smooth, but it is not essential to get out all of the lumps as long as they are not too big.
  7. Fill a deep heavy-bottomed pot with 2 inches of cooking oil and heat to 375°. It’s a good idea to use a thermometer if you have one. Temperature will plunge when you start to fry, so you will need to regulate the flame.
  8. Remove the filled squash blossoms from the refrigerator, and one at a time, dip them into the flour, shaking off any extra. Then dip them into the batter, drain for a minute, and transfer to the hot cooking oil. Working in batches of no more than three or four, fry the blossoms, turning them frequently until they are lightly browned and crisp on all sides.
  9. Drain on multiple layers of paper towel and transfer to a plate in the oven at 200° until they are all fried. Serve immediately.
  10. Three to six individual blossoms make a good appetizer-sized serving for one person. You can gild the lily, so to speak, with a dipping sauce or salsa, but the stuffed flowers can easily stand on their own.


6 Comments

Filed under Food, Photography, Recipes

BLACK HARICOTS VERTS TURNED GREEN

Just as with everything else, there are trends and fashions at the farmers market. Year before last it was cardoons. Last year it was kohlrabis. Now those are old hat. This year one of the new items is black haricots verts. Actually they’re not black but a very deep shade of purple that looks black. The beans are very distinctive, heaped up in baskets next to the regular green pole beans. It’s very hard to resist buying some if you are looking for something a little different to try out.

Many of you experienced cooks probably already know this, but I was surprised and more than a little disappointed when I dropped the beans into boiling water to blanch them, and the purple/black color disappeared. Suddenly my haricots verts were, indeed, green.

Curious to know why that happened, I turned to the most reliable expert on kitchen science that I know, Harold McGee, author of a regular column in the New York Times and numerous books including On Food and Cooking: The Science and Lore of the Kitchen (Second edition, Scribner, New York, 2004). Sure enough, there he had a short scholarly discussion of anthocyanins (pp. 267-268, 281-281) It turns out that the red and purple colors of most flowers and vegetables are due to a group of about 300 related chemicals known as anthocyanins. They are very sensitive to alkalinity and acidity as well as some metals, which help to determine the color that the chemical gives to a flower or vegetable. They are also highly water-soluble, so when the spaces where they are stored break open during the cooking process, the coloration is rapidly diluted and dissipates. Hence, the beautiful black beans turn a beautiful chlorophyll-green. And that’s ok, too, because the blanched haricots verts can be used for whatever might be one of your favorite dishes.

I decided to use them in a chilled salad with scallions and dill, topped with a balsamic vinaigrette. The bright green chlorophyll color was terrific.

RECIPE

Haricots Verts Vinaigrette with Scallions and Dill

Ingredients

  • 1 pound fresh haricots verts, washed and trimmed
  • 4 scallions cut in ½ inch slices, whites and greens included
  • ¼ cup fresh dill fronds, coarsely chopped
  • 1 tablespoon white wine vinegar
  • 1 tablespoon balsamic vinegar (not the expensive stuff)
  • 1 clove garlic, peeled and minced
  • 2 teaspoons Dijon mustard
  • salt and pepper
  • pinch of sugar
  • 6 tablespoons extra virgin olive oil (the good stuff)

Method

  1. In a large pot, bring 2 quarts of salted water to a rolling boil
  2. Add the green beans in a single batch and return the water to the boil
  3. Boil the beans for no more than 4 minutes so that they remain crisp. Drain and immediately plunge into a prepared large bowl of ice and chilled water.
  4. When the beans have cooled, drain and transfer them to the refrigerator until they are ready to use. (Remove any remaining pieces of ice)
  5. Prepare the scallions and dill. Set aside.
  6. Using a whisk and a small bowl, combine the vinegar, minced garlic, mustard, salt, pepper, and sugar.
  7. Whisking continuously, slowly stir in the olive oil to make a vinaigrette. Correct the seasoning.
  8. In a large bowl, combine the haricots verts, scallions, and dill. Dress with the vinaigrette to suit your taste.  Adjust the seasoning. Chill, tightly covered, in the refrigerator for an hour to let the flavors blend.
  9. Serve alone or on lettuce leaves.


5 Comments

Filed under Food, Photography, Recipes

NATIVE PLANTS AND GORDITAS

This last week we drove down to El Paso, Texas, for the New Mexico Native Plant Society annual meeting. Yes, El Paso is in Texas, although there are many who wish it were in New Mexico: many of the residents of the city as well as many Texas politicians. El Paso is in the same time zone as New Mexico, an hour out of sync with almost all of Texas, and the population is decidedly different from those of Dallas and Houston. On top of that, it’s over five hundred miles from El Paso to Houston and San Antonio, and only thirty miles to the New Mexico border and a little over two hundred miles to Albuquerque. But the main reasons that El Paso is part of the New Mexico Native Plant Society is that the ecology (read desert) of El Paso is similar to much of New Mexico; both are on the edges of the Chihuahuan Desert and so the plants are very similar, unlike the live oaks and Spanish moss of East Texas.

We lived in El Paso for a number of years, so the meeting was an opportunity for us to renew old friendships, visit our old neighborhood, and enjoy some of the good regional food of the Border.

Susan went to meetings while I drove around old haunts and took naps, but both of us took time out to eat at two of our old-time favorites, the Little Diner in Canutillo, Texas, and the H & H Car Wash & Coffee Shop in downtown El Paso. We ate at a trendy new restaurant in the refurbished warehouse district. We didn’t much like it, so it will go nameless. But we also enjoyed drinks and snacks in the Liquids Bar in our hotel, a wonderfully revnovated derelict of a hotel that had sat vacant for many years after having a moment of glory in the distant past when Elvis Presley performed there.

Here are a few images of native plants from New Mexico that you might enjoy.

The Little Diner is a local institution. It is extremely hard to find in a residential area of the little town of Canutillo. It sits right next to a coin laundry, so you can do your washing while you are having lunch. Unfortunately, the original owner has died, and her daughter now runs the place. Some of our El Paso friends reported that it had gone down hill, but we had a great experience. The specialty of the house is gorditas, fat little masa pillows deep-fried, slit open, and stuffed with seasoned beef, cheese, tomatoes, and lettuce. You add the salsa to your liking. They are so unlike the pale copies sold at Taco Bell that you wonder how they share the name. They come three to a plate with beans and a salad, so even a big man should not go away hungry. To my knowledge, gorditas are fairly localized to this part of the border. I have never seen them on Tex-Mex menus in the rest of Texas, and they are not a part of the cuisine around Santa Fe.

Gorditas at the Little Diner

Gorditas at the Little Diner

H & H Car Wash is legendary. It was awarded the 2001 James Beard Award for American Classics. Not bad for a hole-in-the wall with a counter and about 10 stools along with two booths. Never mind that you can get your car washed and filled with gas and also get your shoes polished while you wait your turn for jumping on one of those stools. The day we visited, there were heavy rains, decidedly unusual for El Paso (It’s in the desert, remember?) So the car wash didn’t have much business, and as a result the coffee shop was also not crowded. Being able to speak Spanish helps when you order. Actually, many of the staff speak English, but here you are on their turf, and they don’t cut a lot of slack unless it is clear that you need HELP.

I ordered what I always order, huevos rancheros. Their version is unique, and I favor my own version, but it is still delicious and, anyway, that’s the reason I came to eat. Susan got the eggs and sausage. Since it was Saturday morning, we could have also gotten a bowl of menudo that was heating in a big pot on the back of the flat-top. We both passed, but that’s another story.

The night we ate at the bar, we ordered queso fundido (“melted cheese”). The first time we ever had that dish was nearly thirty years ago in Tlaquepaque, Mexico. It was so good with freshly made corn tortillas that it has been a favorite of ours ever since. The bar’s version came with crostini, cutting across cultures, but it was delicious. I will give you a recipe in a subsequent post.

Queso fundido at Liquids

Queso fundido at Liquids

All in all, we had a great visit, and enjoyed some food that we can’t get locally.


10 Comments

Filed under Food, Photography, Restaurants, Travel