Monthly Archives: October 2016

HIDDEN OLIVES

This is another offering I took to the poetry reading. The recipe found its way into the family cookbook many years ago when my sister-in-law sent it to Susan from CaliforniaShe had made hidden olives for a cocktail party, and they got rave reviews. Now the reason that the recipe made it into the cookbook is not because it is delicious – even though it is – but rather because of the laughs that go along with it. The first time she tried the recipe, Susan used jumbo-size olives and the individual pieces turned out also to be JUMBO. At the time, Bernadette Peters was making us all laugh with her advertisement for a medication for indigestion. “What a big dumpling,” her on-screen husband say. “I can’t believe I ate the whole thing!” We, Susan included, thought that the hidden olives were our equivalent of the television big dumpling. If you decide to try the recipe, there are two things to remember about the olives: (1) use small olives, and (2) use olives that have had the seed removed.

For this version, I added butter to make the dough come together. It worked, but it probably also enhanced spreading in the oven. Try the recipe without butter; you can always add some if you need to. Note that with that addition, the recipe is nearly identical with the Southern classic, cheese straws.

RECIPE

Hidden Olives

Ingredients

  • 1 pound sharp or extra sharp Cheddar cheese
  • 1 cup flour
  • 4 tablespoons (½ stick) butter, cut in ½ inch cubes
  • 1/8 teaspoon cayenne pepper
  • 1/8 teaspoon garlic powder
  • 1 teaspoon Worcestershire sauce
  • 32 small pimiento-stuffed olives (a 5 ounce jar should contain more than enough)

Method

  1. Grate the cheese and let stand at room temperature until soft.
  2. Place the grated cheese, flour, butter, cayenne, garlic powder, and Worcestershire sauce in the bowl of a food processor. Process until the ingredients come together as a smooth, soft dough.
  3. On a work surface, shape the dough into a round ball. Cut in half. Shape each half into a ball and again cut in half. Repeat three more times. You should have 32 equal-sized pieces of dough.
  4. One by one, press an olive into the center of one of the pieces of dough, covering the olive completely and rolling between your palms to form a ball.
  5. Arrange the olive-filled balls on a baking sheet lined with parchment or a Silpat, leaving at least 1½ inches between the balls. They will spread during baking.
  6. Bake in the middle of an oven preheated to 400°F for 12 minutes. Remove from the oven and transfer to a cooling rack.
  7. Reheat for a few minutes to serve warm, if possible, though they’re still good at room temperature.

5 Comments

Filed under Food, Photography, Recipes

DIANE’S MARINATED MUSHROOMS

Tonight I’m going to a reading of a writers’ group I have belonged to for a number of years. The reading is an occasional thing where everyone brings something they have written to read to the group, something to drink, and something to eat. It’s really a pot luck poetry reading.

For food, I decided to make a batch of Diane’s marinated mushrooms. The recipe came from the wife of the first colleague I recruited to my department in Shreveport over 40 years ago. The dish was so popular with the family – except, of course, those who don’t like mushrooms – that it received a spot in our family cookbook.  Marinated mushrooms are very easy to make and perfect for a cocktail hour or for a buffet. The two  things that require special attention are to start early enough to get the mushrooms well-marinated and to buy the smallest whole mushrooms you can find.

RECIPE

Diane’s Marinated Mushrooms

Ingredients

  • 1 cup wine vinegar
  • ½ cup olive oil
  • 1 tablespoon salt
  • 1½ teaspoons sugar
  • 1 bay leaf
  • ½ teaspoon ground black pepper
  • 2 teaspoons minced chives
  • 2 teaspoons minced parsley
  • several whole peppercorns
  • 1 tablespoon pickling spice
  • 2 garlic cloves, minced
  • 2 quarts water
  • juice of one lemon
  • 1½ pounds button mushrooms

Method

  1. Prepare the marinade by combining in a quart jar the vinegar, olive oil, salt, sugar, bay leaf, pepper, chives, parsley peppercorns, pickling spice, and garlic. Set aside.
  2. In a large pot, bring the water to the boil. Add lemon juice, and then the mushrooms. Return to the boil, and boil for 3 minutes. Drain and cool the mushrooms.
  3. In a non-reactive container, combine the mushrooms and marinade. Marinate for 24 to 48 hours, stirring occasionally. The mushrooms will shrink in size.
  4. When you are ready to serve, drain and remove the bay leaf and, if desired, peppercorns and bits of pickling spices. Serve with toothpicks. If you can’t find button mushrooms, you can halve or quarter larger mushrooms.

5 Comments

Filed under Food, Photography, Recipes

LAZY MAN’S COTTAGE PIE

Shepherd’s pie (if it’s made with lamb) or cottage pie (if it’s made with beef) are pub favorites in Britain. They’re favorites in our house, too. The ingredients are straightforward, and the recipes are pretty simple. But they do take a lot of time and effort, especially with the mashed potatoes. You scrub, peel, cube, boil, and rice the potatoes. Then you mix them with butter and milk or cream. Finally you layer them over the meat mixture and bake.

It occurred to me that maybe there was a simpler way to deal with the potatoes. Another family favorite is smashed garlic potatoes where you boil russet potatoes in their skins and then mash them coarsely with butter and garlic so they still have lots of lumps, the bane of any self-respecting silky mashed potato. A little egg to bind them together and they might make a tasty – and easy – topping for cottage or shepherd’s pie. I thought I would give it a try. Here’s the result.

RECIPE

Lazy Man’s Cottage Pie

Ingredients

  • 3 tablespoons vegetable oil
  • 1 medium onion, chopped
  • 1 pound ground beef
  • 6 snacking peppers, seeded and sliced into thin rings
  • 6 crimini mushrooms, coarsely chopped
  • 4 tablespoons flour
  • 1 cup beef stock + more as needed
  • ½ teaspoon ground thyme
  • ¼ teaspoon ground bay leaves
  • ½ teaspoon garlic powder
  • salt and pepper to taste
  • 2 medium russet potatoes
  • 2 tablespoons butter
  • ½ cup half-and-half
  • 2 eggs, lightly beaten
  • ¼ teaspoon ground nutmeg
  • salt and pepper
  • melted butter for top

Method

  1. In a large skillet, heat the oil over a medium flame. Add the onions and stir, cooking until they are translucent but not browned. Add the ground beef, breaking up any large pieces. Stir frequently until the beef is lightly browned and all pink is gone. Stir in the peppers and mushrooms and cook for another few minutes until the peppers are wilted and the mushrooms are lightly browned and cooked through.
  2. Stir in the flour to cover all the other ingredients and cook for another few minutes until the oil is absorbed and the flour is cooked through. Add the beef stock and stir to make a gravy. Add stock until the gravy is the consistency that suits you.
  3. Add the thyme, bay leaf, garlic powder, salt, and pepper. Adjust the seasoning and cook a few more minutes. Then transfer to a well-buttered oven-proof dish (a large soufflé dish is perfect) and set aside until you are ready to add the potatoes.
  4. While you are preparing the meat filling, place the unpeeled potatoes in a large pot of well-salted water and bring to the boil. Boil the potatoes until they are easily pierced with a kitchen fork with no resistance. This may take as long as 50-60 minutes.
  5. Remove the boiled potatoes from the heat and drain. Cool enough that you can handle them easily. Mash the potatoes coarsely with a large fork or a potato masher, Leave large chunks. Stir in the butter, half-and-half, and eggs. Cool the potatoes enough that the eggs don’t scramble.
  6. Cover the meat mixture with the potatoes, brush the top with melted butter, and bake in the middle of an oven preheated to 400° for about 45 minutes or until the top is lightly browned and bubbling.
  7. Remove to a cooling rack for 5-10 minutes. Serve while still warm. Should serve 4 persons.


6 Comments

Filed under Food, Photography, Recipes

SHRIMP AND RIGATONI

As we continue our efforts to downsize and declutter, I am working on clearing out the freezer. I found a pound of shrimp that needed to be used, but I was at a loss for a recipe. With shrimp, I often make some of our Louisiana favorites like shrimp creole or seafood gumbo. Barbecued shrimp in the style of the famous New Orleans restaurant, Pascal’s Manale, also sounded like an option, but that recipe calls for really large and really fresh shrimp – and a bit more trouble than I wanted. Shrimp and pasta was another choice, but to tell the truth I am a bit tired of tomato sauces, and somehow the combination didn’t seem quite right. I thought of paella, one of my favorites, but maybe substituting pasta for rice would make a good alternative. All of those ruminations made me think of this combination of shrimp and rigatoni without tomatoes and without saffron. My other goal was to make it a truly one-dish meal. For that, I boiled the pasta in fish sauce in the same cast iron pan where the rest of the ingredients would be added. No pasta-boiling pot to clean up. I topped the finished dish with Parmesan – I know, I know, shellfish and cheese are not supposed to go together. Just try it.

So here’s the recipe.

RECIPE

Shrimp and Rigatoni

Ingredients

  • 2 cups fish stock
  • 2 cups dry rigatoni
  • water
  • 4 scallions, sliced diagonally
  • 6 snacking peppers, seeded and sliced into rings
  • 1 teaspoon paprika
  • ½ teaspoon Old Bay seasoning
  • salt and pepper to taste
  • ½ cup frozen peas
  • 1 pound large shrimp, cleaned and peeled
  • ¼ cup chopped parsley
  • Parmesan cheese, grated

Method

  1. In a large sauté pan, bring the fish stock to a boil. Add the rigatoni and just enough water to cover the pasta. Boil for about 10 minutes until the pasta is al dente, adding more water as needed.
  2. Stir in the scallions, peppers, paprika and seasonings and cook at a simmer for about 5 minutes until the peppers are soft. Add the frozen peas.
  3. Stir in the shrimp and cook until the shrimp have become pink and have lost their translucency. Adjust the seasoning, stir in the chopped parsley,  top with grated Parmesan, and serve immediately in bowls.

5 Comments

Filed under Food, Photography, Recipes

FRITO PIE AND THE FIVE AND DIME

Some folks claim that Frito pie was invented at the Woolworth’s dime store on the Plaza in Santa Fe. The claim is disputed by other pretenders to the throne, and there is no reliable provenance that establishes the claims of anyone. The Woolworth’s store is long shuttered; it has been supplanted by the Five and Dime that tries hard to be a realistic facsimile. The important thing to know is that the Five and Dime continues to sell Frito pie, and the tourists love it.

Not everyone thinks it is good stuff. Anthony Bourdain visited Santa Fe a couple of years ago to tape a segment for his television show. He made hurtful comments including the assertion that the chili came from a can. That offended the owners of the store who insisted that the chili was made fresh every day. They wrote to the editors of the local newspaper demanding that Bourdain make a public apology. To my knowledge, Anthony Bourdain never responded. Probably not a big deal. The dish remains as popular as ever with tourists wandering the Plaza.

The original (??) recipe for this delicacy is quite simple: Tear open a bag of Fritos. Ladle in some chili. Be careful not to overflow the bag as it can get messy. Top with cheese and onions. Stick a plastic spoon in the opening of the bag and serve with a good supply of napkins. Delicious. Just be sure to have a roll of Tums at the ready.

RECIPE

Frito Pie

Ingredients

  • bag(s) Fritos (original style preferred)
  • hot chili (see previous post)
  • grated Cheddar cheese
  • scallions, chopped (use regular onion if you prefer)
  • cilantro leaves, chopped (optional)

Method

  1. Open the bag. You may chose to tear off or cut off the top of the bag. Alternatively, cut or tear an X-shaped hole in the side of the bag, folding back the flaps to make an impromptu bowl.
  2. Ladle in enough chili to cover the corn chips. Sprinkle on generous amounts of cheese, scallions, and optional cilantro.
  3. Eat while still hot.

10 Comments

Filed under Food, Photography, Recipes

OPEN-A-CAN STYLE THREE-BEAN CHILI

This is my sixth post about chili, although three of those have been about chili competitions. Why, you are probably asking. am I writing another?

First, it is the beginning of chili season. Around our house, the groves of aspen are beginning to color the mountainsides with great patches of golden-yellow. Closer to home, the chamisas (aka rabbit brush) are a matching golden-yellow, and the shrubs fill the country side. Unfortunately, they also elicit a characteristic allergy season. Purple asters fill in the bare spots between the chamisas while spikes of purple gay feather brag in clumps around the yard and the trailsides. Purple and gold are a beautiful combination of color that makes autumn around here so spectacular, never mind the reds and bronzes of the sumacs and the deciduous trees.

Second, the Terlingua chili competitions are only a month or so away. I’m sure my friend, Reggie, has been cooking in contests all summer long so that he has enough points to enter the competition. I hope that he plans to go because he has so many friends and fellow chili cooks who go to the big celebration

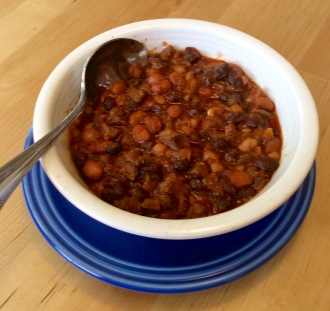
Third, there must be an infinite number of chili recipes, and I believe that the home cook can never have too many chili recipes. This, of course, excludes the entire mystique of Cincinnati two-way, three-way, four-way and the ultimate five-way chili. This recipe is particularly simple. Except for the meat and the onions, it is simply a matter of opening cans and dumping them all together. I admit that I made things a little more complicated by buying the best grade of stew meat I could find and cutting it into ¼ inch pieces. That’s what competition cooks did many years ago until someone using ground beef won the Terlingua contest. Since that tectonic event they have almost all switched to ground beef. You can do that, too, and then the recipe becomes even easier. I have used three different beans (definitely NOT a component of competition chili) to make the visual effect of the finished product more interesting. The seasonings are only a guide. In particular, use as much chili powder – 2 or even 5 tablespoons – to suit your taste and your tongue.

RECIPE

Open-a-Can Style Three-Bean Chili

Ingredients

  • 1 pound beef stew meat
  • vegetable oil
  • 1 medium onion, diced
  • 3 cloves garlic, minced
  • 1 can (15 ounces) tomato sauce
  • 1 can (15 ounces) beef stock + more if needed
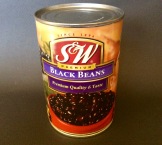
  • 1 can (15 ounces) black beans, drained and rinsed
  • 1 can (15 ounces) pinto beans, drained and rinsed
  • 1 can (15 ounces) white chili beans, drained and rinsed
  • 1 tablespoon chili powder (not ground chiles)
  • 1 tablespoon Mexican oregano, crushed
  • 1 teaspoon ground cumin
  • salt and pepper to taste

Method

  1. Cut the stew neat into ¼ inch cubes. Sauté in the oil in a large, heavy bottomed soup pot over high heat, cooking until released water is boiled off and the meat is browned. Remove the meat to a plate and return the pot to the stove over medium heat.
  2. Sweat the onions in the heated oil, covered, until the onions are translucent but not browned. Return the browned meat to the pot.  Add the garlic and cook for another minute or two.
  3. Stir in the tomato sauce, beef stock, beans, chili powder, oregano, and cumin.  Bring the mixture to the boil and then reduce heat to the simmer. Adjust seasoning with salt and pepper. Add more beef stock if the chili becomes too dry.
  4. Simmer for 1 hour. Serve while still hot.


7 Comments

Filed under Food, Photography, Recipes