Monthly Archives: December 2012

RED BEANS AND RICE

Whenever our children visit us with their families, as they did this Christmas season, we try to make old favorites from their childhood. Often the food is drawn from the Southwest, but all three of them grew up in Louisiana, so Cajun and Creole dishes are high on the list of favorites. Gumbo is popular, and boiled crawfish in the spring is almost required. Bread pudding and shrimp creole are also on the list, along with red beans and rice.

For as long as anyone can remember, Monday has been laundry day in New Orleans. For as long as anyone can remember, red beans and rice has been the standard Monday supper in New Orleans because it can be started when the wash is started, stirred from time to time during the day, and finished when everyone is ready to gather around the table in the evening. We didn’t live in New Orleans, but the custom is common throughout the entire state of Louisiana.

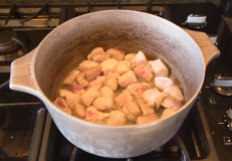
An essential part of the dish is the meat that is used in the red beans. Traditionally a ham hock is tossed in – mostly for flavor – but also for the morsels of ham that are closest to the bone. Andouille sausage is popular as is Tasso ham. Sometimes you will see whole pork chops swimming in the stew. For this version, I chose boneless pork loin which gives good flavor and tenderness without bones. The chunks of pork fit perfectly on the fork and make a single melt-in-your-mouth bite.

Usually red beans and rice have the spiciness that is famous in Cajun and Creole cooking, but because one of our family members has severe reactions to hot spices, we make it without red pepper or chiles. Not to worry, because it is easy to add your preferred level of hotness at the table with Tabasco or Louisiana hot sauce.


RECIPE

Red Beans and Rice

Ingredients

  • 1 pound dry small red beans
  • water to cover the beans for cooking
  • 3 tablespoons olive oil
  • 1 medium onion, chopped
  • 3 ribs celery, chopped
  • 1 large bell pepper, seeded and membranes removed, chopped
  • 2 cloves garlic, minced
  • 2 pounds boneless pork loin, cut into ¾ inch cubes
  • 1 bunch green scallions including green stems, chopped
  • 2 bay leaves or ¼ teaspoon ground bay leaves
  • ¼ teaspoon ground thyme
  • salt and pepper to taste
  • Louisiana hot sauce to taste
  • 1 cup long-grain rice, rinsed in a fine sieve with cold water
  • 1½ cups water

Method

  • Pour the beans into a heavy-bottomed pot and cover with water. Bring to the boil and then reduce heat to a ver slow boil. Cover and cook the beans for 1½ to 2 hours or until they are tender. Stir the bottom occasionally and add more water if needed.
  • When the beans are tender, transfer them and the cooking liquid to a large bowl Rinse and dry the pot. Then return the pot to a medium flame and add the olive oil.
  • When the olive oil is just shimmering, add the chopped onions, lower the heat and cover so that the onions “sweat” (become soft and translucent and give up some of their moisture). Do not let them brown.
  • Remove the lid, turn up the heat to medium and stir in the celery, green pepper, and garlic. Cook, stirring frequently until the vegetables are throughly wilted. Then transfer them and their juices to a plate.
  • Return the pot to the stove. Add the cubes of pork and brown them. Use more oil if needed.
  • When the meat is evenly browned, return the beans and their liquid, along with the vegetables, and bring the mixture to the boil. Add the scallions, bay leaves, and thyme.
  • Simmer the mixture, covered, for an additional hour. Adjust the seasonings with salt, pepper and, if desired, hot sauce. Remove the bay leaves
  • While the red beans are cooking, prepare the rice by combining the rice and water in a small covered pot. Bring to the boil. Stir. Cover and reduce the flame to very low. Do not remove the cover, but cook for 20 minutes. Test for doneness. The water should be completely absorbed, and the rice should be fluffy with individual grains.
  • Serve by placing a scoop of rice in the middle of a wide-mouthed bowl. Top with the red bean mixture, and serve with additional hot sauce.

Should serve 6 to 8

6 Comments

Filed under Food, Photography, Recipes

CHICKEN TAMALES, A CHRISTMAS TRADITION

Our family has lived in the Southwest USA long enough that we have adopted many of the local traditions, especially those that have to do with food and with Christmas. For many years we have gathered around the kitchen table on Christmas Eve to make and then eat tamales.

The event is festive, with everyone laughing and each person assigned a particular task. Susan usually prepares the masa – always with lard, and beaten until the dough floats on water to show that it has enough incorporated air. I prepare the corn husks in hot water so that they are pliable and can be used to wrap up the dough and filling. Others make the filling. Our favorite is chicken. The recipe came from the back of a bag of masa harina from many years ago.

Pork in red chile is more traditional, and we sometimes make those, too, but our family favorite is chicken with an unusual ingredient – olives.

After the filling and dough are prepared, the teamwork and fun begin.  Some spread the masa dough on the corn husks. Others put on the filling. Others wrap up the tamales. We try to make things come out even with just enough filling for the masa dough. Usually it doesn’t, and we have a little of one or the other left over. Even at that, we always wind up with enough tamales for everyone to get their fill.

Finally, the tamales  are stacked on a trivet in a big pot to be steamed. The steamer pot is put on the stove, and the tamales are cooked to perfection.

While we wait – it may take an hour or so – we sit around the Christmas tree and enjoy a mug of home-made eggnog. Then the feast begins before it is time for bed and dreams of Christmas Day.

This year, Sarah and her son will join us for a few days before Christmas while Carol and her family will arrive on Christmas Eve so we won’t be able to have our tamales party. Instead we will make them ahead, freeze them, and then thaw and steam them for each of our visiting families.


RECIPE

Ingredients

Filling

  • 1 medium onion, chopped
  • 1 tablespoon vegetable oil
  • ½ cup taco sauce, canned or homemade
  • 1/3 cup black olive slices
  • 1 teaspoon cumin
  • 1 teaspoon salt
  • 4 cups shredded cooked chicken

Masa

  • 1 cup lard (may substitute vegetable shortening)
  • 2½ cups masa harina
  • 2 teaspoons ground red chiles (do not use chili powder)
  • 1 teaspoon salt
  • 1¾ cups chicken stock

Corn husks for filling (about 2 dozen, soaked in hot water)

Method

  • Sauté onions in oil. Then add taco sauce, olives, cumin, salt, and chicken.  Combine well, cook over medium heat for about 5 minutes, then set aside.
  • In a stand mixer, cream the lard (or shortening) until fluffy. Then add masa harina, chiles, salt, and chicken stock. Continue to beat until the mixture is light and fluffy enough that a small piece of the dough floats in water.
  • Divide the masa into 24 balls. Spread each of the dough balls onto a soaked corn husk so that the dough comes to the edge of the husk. Place a good-sized tablespoon of the filling on the dough, fold over the two edges of the husk so that the dough completely covers the filling. Then fold over the two edges of the corn husk so that the dough completely covers the filling. Fold the tail of the folded husk over the tamal.
  • Stack the finished tamales on a trivet over water in a large kettle
  • Steam, covered, over gently boiling water for about one hour or until the masa does not stick to the corn husks. Serve warm with your favorite chile sauce or molé.
  • If you choose to freeze the tamales, thaw them completely before steaming.

Don’t try to make the dough without a mixer as the dough is heavy and it really does need to float in water before you quit beating. That’s hard on the modern wrist. You can use vegetable shortening if you wish, but the tamales are never as tasty as those made with lard. Choose your own degree of heat with the ground chiles. Personally, I prefer “hot”, but some in our family are incredibly sensitive so we choose “mild”. You can always douse your personal tamales with hot sauce.

IMPORTANT: Remember to remove the corn husk wrapper before you eat the tamal.

There should be about 2 dozen tamales.

4 Comments

Filed under Food, Photography, Recipes

LAS POSADAS AND BISCOCHOS

Along the Border in El Paso, they’re called biscochos and in Northern New Mexico they are called bizcochitos, but they are the same cookie and an important part of the Christmas tradition. They are served at nearly every party, but they are essential to Las Posadas. This celebration recalls the biblical story of Mary and Joseph seeking lodging on their journey to Bethlehem in order to participate in the census. Throughout New Mexico the story is re-enacted in villages and urban centers alike. Two individuals dressed as Mary and Joseph lead a band of pilgrims from door to door, often around the plaza, seeking lodging. Repeatedly they are turned away, often with scornful cries, until at last they are welcomed in –  usually at the church on the plaza – to find rest and warmth.

Once the crowd is inside the welcoming site, there is a celebration with traditional songs, hot drinks like atole, and treats, always including biscochos.

There are many recipes for biscochos, but the best ones always include lard. This recipe is the best of the best. It comes from Lorenza Zuñiga, an amazing woman who worked as my promotora de salud many years ago when I worked in the clinics in the colonias along the Texas-Mexico border.

RECIPE

Ingredients

For cookies

  • 7½ cups flour
  • 1½ cups sugar
  • ½ teaspoon salt
  • 3 teaspoons baking powder
  • 1½ teaspoon ground cinnamon
  • ½ teaspoon ground anise
  • 1 pound lard
  • 4 eggs, beaten
  • 1/3  cup pineapple juice (more if the dough is too dry)

For sugar-coating

  • 1 cup sugar
  • 1 tablespoon ground cinnamon
  • 1 teaspoon ground anise

Method

  • Sift together the flour, sugar, salt, baking powder, cinnamon, cloves, and anise. Then add lard and mix well before adding beaten eggs and enough pineapple juice to make a soft dough. You may need to knead with your hands for a few minutes to incorporate all the ingredients.
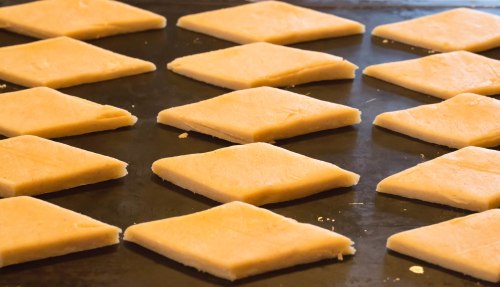
  • Roll out the dough on a lightly floured surface to a ¼ inch thickness. This should make a circle about 20 to 24 inches across. Cut into diamond shapes and place on an ungreased baking sheet.
  • Bake in an oven preheated to 350° for 10 to 15 minutes or until light brown. Check often as the cookies burn easily.
  • While the cookies are baking combine the remaining sugar, cinnamon and anise and place in a tray or other wide, shallow container.
  • When the cookies are baked, transfer them, still warm, to the sugar mixture in a tray. Turn them while cooling to completely coat them
Lard and dry ingredients

Lard and dry ingredients

Kneaded dough

Kneaded dough

Sugar and spice topping

Sugar and spice topping

Cutting two-inch diamond shapes

Cutting two-inch diamond shapes

Ready to bake

Ready to bake

Cooling and ready to eat

Cooling and ready to eat

The recipe makes about 3 dozen cookies, of course depending on the size of the diamonds.

8 Comments

Filed under Food, Photography, Recipes

HUEVOS RANCHEROS

Daughter Sarah surprised us with a short visit, so we cooked up some of the favorites of her childhood. One of the breakfast specials was huevos rancheros. The real version takes some effort since you need to make the ranchero sauce from scratch along with a base of refried beans.

This version can be cooked up in a flash using items from the pantry like bottled salsa. You may not be able to find blue corn tortillas – they seem to be sort of a New Mexico specialty – but any kind of corn tortilla will do. We had some guacamole left over from the night before, but fresh avocado slices also make a good garnish.

Blue corn tortillas

Blue corn tortillas

RECIPE

Green chile sauce

Green chile sauce

Huevos Rancheros

Ingredients

  • 2 blue corn tortillas (yellow, white, or any other color will do)
  • 2 ounces sharp Cheddar cheese, shredded
  • 2 tablespoons chopped white onion
  • 2 eggs
  • butter
  • green chile sauce, heated
  • 3 tablespoons guacamole

Method

  • Heat the tortillas on a dry hot skillet until they bubble a bit and are lightly covered with brown flecks. They should remain soft and flexible
  • Place one tortilla on a plate. Arrange half the cheese and onions on top. Cover with the second tortilla topped with the remaining cheese and onions.
  • Heat the plate in an oven at 200° or in a microwave for 20 seconds or so until the cheese is melted.
  • In the meantime, fry the two eggs in a skillet with butter.
  • When the eggs are cooked to your preference, transfer them to the stacked tortillas
  • Surround the eggs with the heated green chile sauce and garnish with guacamole.
  • Serve immediately.
Huevos rancheros

Huevos rancheros

1 Comment

Filed under Food, Photography, Recipes

AIX-EN-PROVENCE AND PASTRY CREAM

Back to Europe. One of our favorite visits during our recent Mediterranean cruise was a beautiful little city just north of Marseilles. Aix-en-Provence is about the same size as Santa Fe but a lot older. We think that Santa Fe is old and it is for the USA, going back to 1510. But Aix-en-Provence dates back at least to 300 BCE and was a Roman outpost in 150 BCE. The main part of the “old” town, though,  dates to the sixteenth,  seventeenth and eighteenth centuries, while the “new” city is filled with modern buildings and young students from the several universities and colleges located there.

We spent a too-short-day strolling up the Cours Mirabeau from the elegant fountain set in the center of la Rotonde to the statue of the “Good King” René at the head of the street before turning into narrow streets lined with beautiful old houses and interesting shops. The Cours Mirabeau is a narrow street set between two wide sidewalks under palisades of towering plane trees. Moss-covered fountains sit in roundabouts in the narrow street. Banks line one side of the boulevard, and there are several cafés on the other side. The cafés include the Deux Garçons famous for hosting Cézanne, Zola, and other famous artists and writers.

Instead of stopping in one of those cafés, we chose to continue our stroll through the old town. One of our stops was a farmers’ market in the place de l’Hotel de Ville. There were rows and rows of stalls filled with fresh fish and shellfish, meats, sausages, eggs, vegetables of all sorts, jellies, soaps, and even a smiling bronze boar peeking from behind a refrigerator truck. The market stood under the shadow of a sixteenth century clock tower and flags of the European Union, France, and Provence.

Enticed by a windowful of elegant pastries, we took a break at La Boutique du Glacier with tea and coffee and pastries including a delicious napoleon.

We walked past the carousel before boarding our tour bus to end a most enjoyable day that we would like someday to repeat.


RECIPES

Inspired by our visit to Aix, this is an effort to make a simple napoleon with absolutely no pretenses of duplicating the wonderful pastry we enjoyed in France.

First task is to make the pastry cream. This is a cousin to the three sibling creams I wrote about a while back: creme anglaise, creme brulee, and crema catalana. The main difference with this cousin is the addition of flour which enables you to boil the sauce without worrying about scrambling the egg yolks. It is actually fairly easy to make..

Puff pastry is beyond most home cooks – at least this one – so frozen sheets of pastry become the ticket to making an easy, quick, but tasty “home-made” napoleon.

CRÈME PÂTISSIÈRE

Ingredients

  • ¼ cup sour cream
  • ¾ cup milk
  • ¼ cup sugar
  • 3 tablespoons flour
  • ¼ teaspoon salt
  • 4 egg yolks
  • 2 teaspoons vanilla extract
  • 2 tablespoons unsalted butter

Method

  • In a medium, heavy saucepan, heat the milk just to boiling
  • In a medium bowl, mix the sugar, flour, and salt. Then pour in the heated milk gradually, stirring to eliminate lumps. Then return the mixture to the saucepan and bring to a gentle boil, stirring continually until the mixture is thickened and smooth.
  • Remove from the heat and cool just slightly before beating in the egg yolks. Stir constantly while returning to a boil. The eggs will not curdle with the added flour.
  • Cook for about 1 minute. Then remove from the heat and, beating constantly, let it cool for about another minute before adding the vanilla and butter.
  • Continue to beat until the butter is completely  melted and incorporated into the sauce.
  • Transfer the sauce to a small bowl. Cover with plastic film directly on top of the sauce to prevent the formation of a skin, and cool in the refrigerator for an hour or mor

EASY NAPOLEONS

Ingredients

  • 1 sheet commercial frozen puff pastry
  • 1 batch creme patissiere
  • 2 teaspoons cocoa powder
  • 2 teaspoons confectioner’s sugar

Method

  • Remove one sheet of frozen puff pastry from the package and thaw according to package instructions
  • Place the thawed pastry sheet on a lightly floured surface and roll very lightly with a rolling-pin to smooth the folds in the pastry.
  • With a sharp knife, cut the sheet in half and then each half into 6 equally-sized bar shapes.
  • Transfer the shaped pastries onto a parchment-lined baking sheet.
  • Bake at 400° for 15 minutes or until the tops are lightly browned
  • Cool the baked pastries on a rack. Then split each in half so that you have 24 individual layers
  • Spread pastry cream between layers, stacking them so that each pastry has four layers. You will probably need to flatten the top of the bottom pastry by slicing a thin layer off the top with a very sharp knife.
  • Brush the tops of the assembled pastries with milk and then sprinkle with a mixture of the cocoa and confectioner’s sugar using a tea strainer.

Makes six napoleons

6 Comments

Filed under Food, Photography, Recipes, Restaurants, Travel

A SHORT HISTORY OF CORN

A couple of years ago, my two daughters and I started a book about corn (maize) to include recipes for a wide range of corn-based breads from around the world. The project bogged down when I started writing a blog, but we plan to revive our effort. Here is a short excerpt from the introduction. It may be more than you want to know about corn (maize), but I hope that you will find it interesting.

Nearly every American  school child knows that when the Europeans first came to the New World, they found a virtual cornucopia of foods which they had never seen or tasted before.  The explorers took back to their homeland many foods that soon became imbedded in cuisines in Europe, Asia, and Africa. Of these edibles, eight of the current 26 top crops by tonnage have become essential to many diets, and include maize (called corn in the United States and other English-speaking countries), potatoes, tomatoes, chiles, peanuts, manioc, chocolate and vanilla, and sweet potatoes. Other important New World contributions to the global diet included beans, squash, turkeys, pineapple, and avocado, along with numerous herbs, fruits, and nuts.  Of these foods, undoubtedly corn has become the most important for providing nutrition and calories throughout the world and in all socio-economic situations.  To support this contention, consider that corn (or maize) is grown on all of the inhabited continents, China grows more corn than any other country, and corn-based dishes are served in China, India, Africa, England, France, Italy, and all of the countries of Central and South America. Refined corn is used for cooking oil, sugar substitute, and food additives. Corn serves as a major food source for animals raised a sources of meat. It is an integral and essential part of nearly every human’s diet.

History of cultivation

Maize (corn) was domesticated nearly 9,000 years ago by people living in the region of what is now the Mexican states of Michoacán, Guerrero, and Mexico. Like all modern food grains, it arose from a wild grass – in this case a large grass, Balsas teosinte, that even to this day grows in the Central Balsas River Valley. 

Balsas teosinteAlthough no one knows exactly how or how long the process of domestication developed, clever modern breeding studies have produced hybrids of teosinte and maize that give us an idea of what some of the grains may have looked like along the way.

teosinte and maize cobsIt is clear that both the Aztecs and Mayas consumed domesticated maize, and archeological records document that domestic corn spread to Panama by 7,600 years ago and to Uruguay by 4,600 years ago. Later, domesticated corn spread throughout both North and South America so that it was an important part of the diet of the native peoples throughout the New World when the Europeans arrived. The European explorers took back seed grain, and the cultivation of corn spread quickly throughout Europe and then into Africa and Asia. This rapid acceptance occurred  largely because of ease of cultivation, wide range of favorable growing conditions, and usefulness as a basic foodstuff. Now virtually every culture in the world depends upon corn and has unique and traditional dishes based upon the grain.

3 Comments

Filed under Food, Photography, Travel